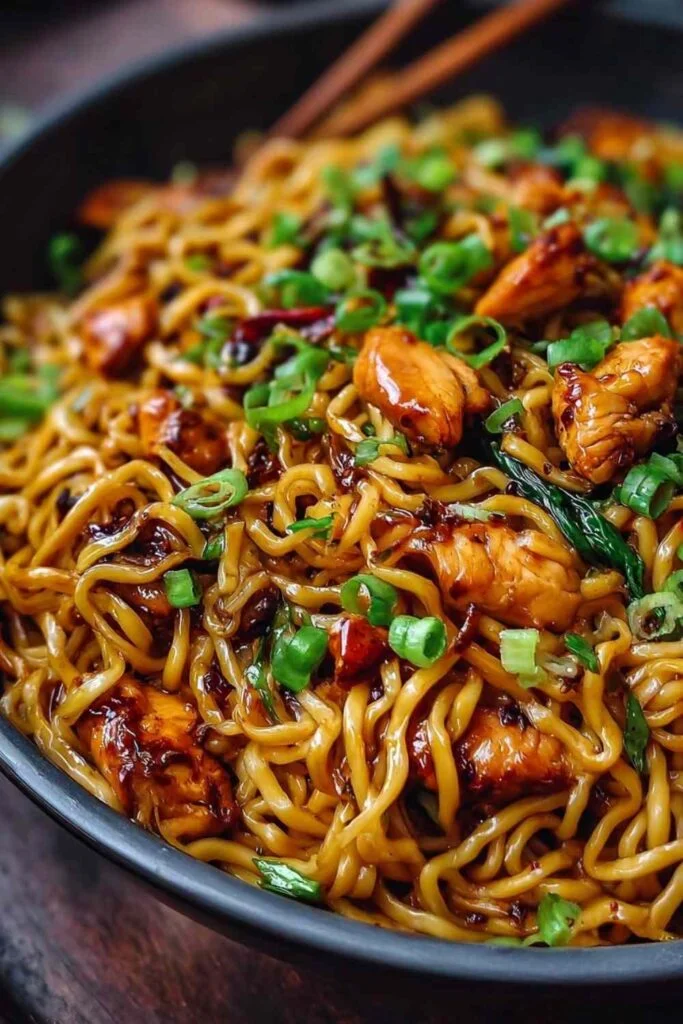
Sticky garlic chicken noodles check every box for a dinner that works as hard as you do. The sauce comes together in minutes, the chicken gets golden and slightly crisp from a cornstarch coating, and every strand of noodle ends up glossy and coated in a sweet-savory garlic glaze that actually improves overnight. If you meal prep regularly, this one earns a permanent spot in your rotation.
It’s the kind of dish that satisfies a takeout craving without the wait or the cost. The whole thing is on the table in 30 minutes, and portioning it into containers right after cooking means lunch and dinner are handled for the next few days.
Whether you’re cooking for the week ahead or feeding a hungry family tonight, this recipe delivers.
Why You’ll Love This Protein Prepper’s Sticky Garlic Chicken & Noodles
The sauce is the highlight here. Garlic, ginger, honey, and soy sauce reduce into a glossy glaze that clings to the noodles instead of pooling at the bottom of the bowl. That stickiness is what makes it so satisfying.
Cornstarch does double duty in this recipe. It gives the chicken a light, golden crust when it sears and then helps the sauce thicken into that lacquered finish once everything comes together in the pan.
The noodles hold up beautifully over multiple days, which makes this an ideal meal prep choice. Unlike rice-based dishes that can go dry, the noodles continue absorbing the sauce and the flavor deepens by day two. You can also swap proteins easily, add whatever vegetables you have on hand, and adjust the heat level to suit your household.
Ingredients for Protein Prepper’s Sticky Garlic Chicken & Noodles
I always reach for low-sodium soy sauce here because the sauce reduces as it simmers and regular soy sauce can get quite intense. It gives you more control over the final flavor without losing any of the savory depth.
The Protein & Noodles:
- 1.5 lbs boneless, skinless chicken breasts, cut into small cubes
- 8 oz dry noodles (udon, lo mein, or spaghetti)
- 1 tablespoon cornstarch
- 1 tablespoon oil for frying
- Salt and pepper to taste
The Sticky Garlic Sauce:
- 1/4 cup low-sodium soy sauce
- 2 tablespoons honey or brown sugar
- 1 tablespoon rice vinegar
- 4 cloves garlic, minced
- 1 teaspoon fresh ginger, grated
- 1 teaspoon Sriracha (optional)
Garnish:
- Sliced green onions
- Sesame seeds
For the noodles, udon is my go-to because the thick, chewy texture holds the sauce well and gives each bite some real substance. Lo mein works beautifully too. Spaghetti is a perfectly fine pantry substitute and actually performs better than you’d expect once it’s coated in the glaze.
Fresh ginger makes a noticeable difference here compared to the dried version. I keep a knob in the freezer and grate it straight from frozen, which is easier than working with it fresh and means it’s always on hand. For the honey versus brown sugar choice, honey creates a slightly more complex glaze, while brown sugar gives a deeper molasses note. Both work well.
How to Make Sticky Garlic Chicken Noodles
I find the whole process goes smoothly when you get the noodles cooking first and use that time to prep everything else. By the time the chicken is seared and the sauce is done, the noodles are ready to go straight into the pan.
- Bring a large pot of salted water to a boil and cook the noodles according to package directions. Drain and rinse under cold water immediately if you’re not tossing them into the sauce within the next two minutes. This removes surface starch and keeps them from clumping together.
- While the noodles cook, toss the chicken cubes with cornstarch, salt, and pepper in a bowl until evenly coated. The cornstarch layer is what creates the slight crunch and helps the sauce stick to the chicken.
- Heat the oil in a large skillet or wok over medium-high heat until it shimmers. Add the chicken in a single layer and cook for 6 to 8 minutes, turning once halfway through, until golden brown on the outside and cooked through. Don’t crowd the pan or the chicken will steam instead of sear.
- While the chicken cooks, whisk together the soy sauce, honey, rice vinegar, garlic, ginger, and Sriracha in a small bowl or jar. This takes about two minutes and keeps things moving efficiently.
- Once the chicken is cooked through, pour the sauce directly over it in the skillet. Let it simmer over medium heat for 2 to 3 minutes. You’ll see it start to bubble and thicken into a glossy glaze. The honey combined with the residual cornstarch from the chicken is what creates that lacquered finish.
- Add the drained noodles to the skillet. Using tongs, toss vigorously for 1 to 2 minutes until every noodle is coated. The sauce will continue to reduce slightly and cling to the noodles as you toss.
- Plate immediately and top with sliced green onions and sesame seeds.
Pro tip: If the sauce thickens too fast before the noodles are fully coated, add a tablespoon or two of water and toss quickly. It loosens the glaze just enough to coat everything evenly without diluting the flavor.
What to Serve with Sticky Garlic Chicken Noodles
This dish is filling on its own, but a simple vegetable side turns it into a well-rounded dinner.
Steamed Bok Choy: Its mild, slightly bitter flavor is a natural contrast to the sweet garlic sauce. Steam it for 3 to 4 minutes and finish with a drizzle of sesame oil. It adds crunch and freshness without competing with the noodles.
Snap Peas: Toss them raw into the skillet during the last minute of cooking or serve them lightly blanched on the side. Their sweetness and snap pair well with the savory glaze.
Cucumber Salad: A quick rice vinegar cucumber salad with a pinch of sesame seeds offers a cooling contrast that cuts through the richness of the sauce.
Sesame Ginger Broccoli: Roasted or sauteed broccoli with a light sesame ginger dressing adds fiber and a slightly nutty flavor that fits right in with the Asian-inspired profile of the dish.
Miso Soup: A simple miso broth on the side rounds out the meal and adds a warm, savory element without much extra effort.
Pro Tips & Variations
Double the sauce for meal prep. When portioning into containers, extra sauce keeps the noodles from drying out in the fridge. I mix a half batch of sauce and drizzle it over the portions before sealing.
Slice the chicken thin and even. Smaller, uniform cubes cook faster and sear more evenly. Aim for pieces no larger than 3/4 inch so they cook through in the 6 to 8 minute window.
Swap the protein. Large shrimp cook in about 3 minutes per side and work beautifully with this sauce. Firm tofu, pressed and cubed, gives a plant-based version that’s just as satisfying once it picks up the glaze.
Go gluten-free. Use tamari instead of soy sauce and swap in rice noodles. The sauce behaves the same way and the result is nearly identical.
Add vegetables directly to the skillet. Sliced mushrooms, shredded carrots, or baby spinach can go in with the noodles at the tossing stage. They wilt and coat quickly without requiring separate cooking.

Storage & Reheating Tips
Store cooled portions in airtight containers in the refrigerator for up to 4 days. I use glass meal prep containers here because they don’t absorb the garlic and ginger aromas the way plastic tends to.
To reheat, add the noodles to a skillet with a tablespoon of water over medium heat and toss for 2 to 3 minutes until warmed through. The water rehydrates the sauce and restores the glossy texture. Microwaving works in a pinch, but the noodle texture suffers slightly compared to the stovetop method.
For meal prep, this portions exceptionally well. Divide into four equal containers right after cooking, while the noodles are still warm and loosened. Once cold, they compact a bit but reheat back to their original texture.
Common Questions
Can I use rotisserie chicken to save time? A: Yes, shredded rotisserie chicken works well here. Skip the cornstarch coating and searing steps and add the chicken directly when you pour in the sauce. The texture will be softer rather than seared, but the flavor is still excellent.
My sauce isn’t thickening. What went wrong? A: A few things can affect how the sauce thickens. Make sure the heat is at a steady medium simmer, not too low. If the chicken didn’t have much residual cornstarch, whisk a half teaspoon of cornstarch into a tablespoon of cold water and stir it into the sauce while it simmers. It should thicken within 60 seconds.
Is this recipe spicy? A: Without the Sriracha, this is a mild dish. The garlic and ginger add warmth but not heat. Add the full teaspoon of Sriracha for a gentle kick, or up to a tablespoon if your household enjoys a more noticeable heat level.
These sticky garlic chicken noodles are a meal prep staple worth adding to your regular lineup. The flavors are bold, the prep is minimal, and having four ready-to-go portions waiting in the fridge makes the rest of the week significantly easier. Give it a try on Sunday and see how quickly it disappears before Friday.
Protein Prepper’s Sticky Garlic Chicken & Noodles
Ingredients
Equipment
Method
- Bring a large pot of salted water to a boil and cook the noodles according to package directions. Drain and rinse under cold water if not using immediately to prevent clumping.
- Toss the chicken cubes with cornstarch, salt, and pepper in a bowl until evenly coated.
- Heat oil in a large skillet or wok over medium-high heat until shimmering. Add the chicken in a single layer and cook for 6 to 8 minutes, turning once, until golden brown and cooked through. Avoid crowding the pan.
- While the chicken cooks, whisk together the soy sauce, honey, rice vinegar, garlic, ginger, and Sriracha in a small bowl.
- Pour the sauce over the cooked chicken in the skillet. Simmer over medium heat for 2 to 3 minutes until the sauce thickens into a glossy glaze, bubbling around the edges.
- Add the drained noodles to the skillet. Using tongs, toss vigorously for 1 to 2 minutes until every noodle is fully coated in the sticky garlic sauce.
- Plate immediately and top with sliced green onions and sesame seeds. Serve hot.