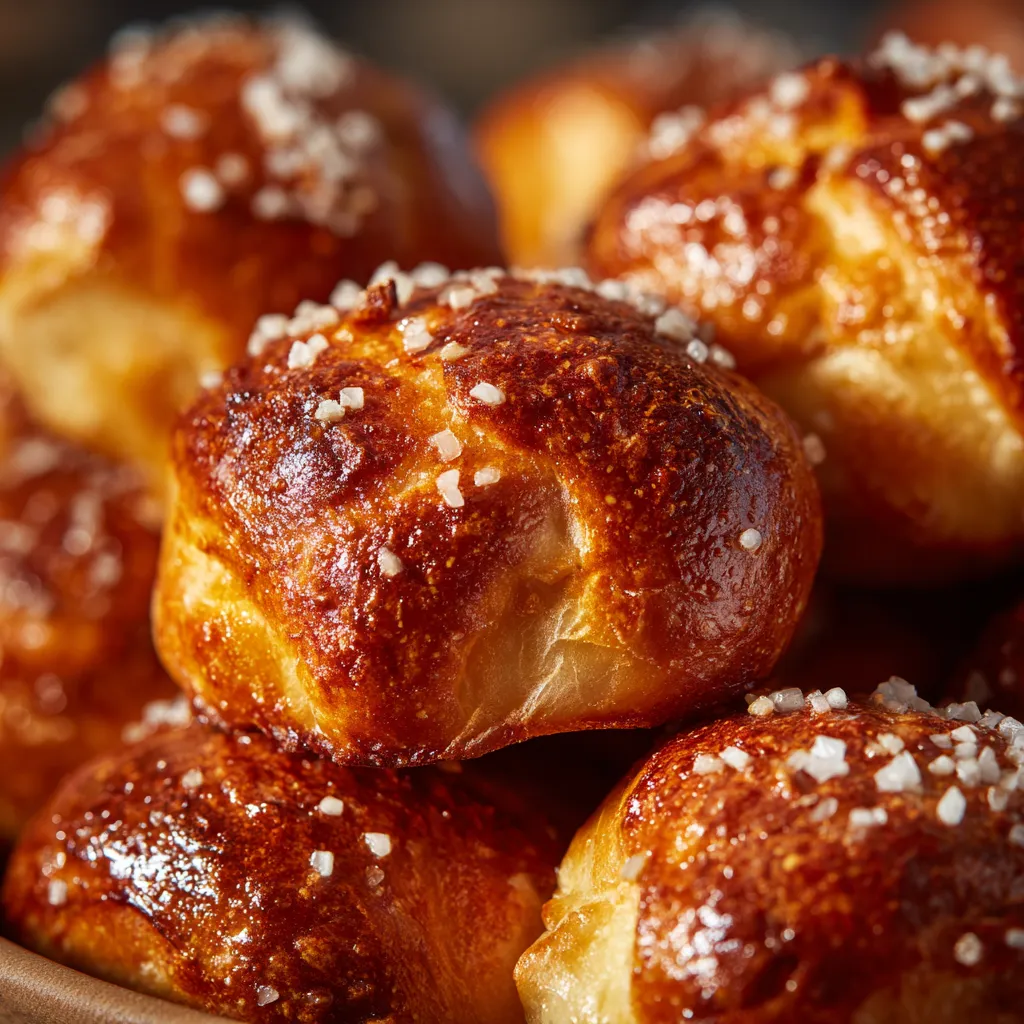
I’ll never forget the first time I tried a soft pretzel at a street fair. The warm, salty dough and that slight tang from the baking soda bath? Pure bliss! I immediately wanted to recreate that magic at home. After countless attempts (some disastrous, I admit!), I finally nailed it. Today, I’m sharing all my secrets for the most amazing Easy Homemade Soft Pretzel Bites – Ready in Minutes! you’ll ever make, and trust me, you’re going to be obsessed.
Let’s Make Some Magic: Easy Homemade Soft Pretzel Bites

Okay, my friends, let’s dive into the world of soft pretzel bites! I know, I know, making pretzels from scratch can seem intimidating, but I promise you, this recipe is different. This is my go-to recipe whenever I’m craving that warm, chewy goodness. And the best part? It truly is ready in minutes! We’re talking faster than you can order takeout.
Before we get started, let me just say: don’t be scared! I’m going to walk you through every single step, holding your hand (figuratively, of course!) the entire way. We’ll troubleshoot any potential pitfalls together, and by the end, you’ll be a soft pretzel bite pro. Are you ready? Let’s do this!
What You’ll Need: The Ingredients
First, let’s gather our ingredients. Nothing too fancy here, just pantry staples you probably already have. This is what I love about this recipe – simple ingredients, incredible results!
- 1 ½ cups warm water (about 110-115°F): This is crucial for activating the yeast. Make sure it’s warm, not hot! Too hot, and you’ll kill the yeast, and we don’t want that.
- 1 teaspoon sugar: Just a little something to feed the yeast and get it going.
- 2 ¼ teaspoons active dry yeast (1 packet): The magic ingredient that makes our dough rise. Make sure your yeast isn’t expired!
- 1 tablespoon salt: For flavor, of course! Don’t skip this.
- 4 cups all-purpose flour: I usually use all-purpose, but you can also use bread flour for a chewier texture.
- ¼ cup baking soda: This is what gives pretzels that characteristic flavor and color. Don’t be tempted to use baking powder!
- 8 cups water: For the baking soda bath. Yes, that’s a lot of water, but it’s important for the process.
- 1 large egg, beaten: For the egg wash. This gives the pretzels a beautiful golden-brown sheen.
- Coarse salt, for sprinkling: Pretzel salt is ideal, but you can use any coarse salt you like. Sea salt flakes are a fantastic option too!
Gather Your Tools: Equipment You’ll Need
Okay, ingredients? Check! Now let’s talk about equipment. Luckily, you don’t need anything super specialized. Here’s what I recommend:
- Stand mixer (optional, but recommended): A stand mixer makes kneading a breeze. But don’t worry, you can absolutely knead by hand!
- Large mixing bowl (if kneading by hand): Make sure it’s big enough to accommodate the dough as it rises.
- Measuring cups and spoons: Accuracy is key in baking!
- Baking sheet: A good quality baking sheet is a must.
- Parchment paper or silicone baking mat: This prevents the pretzels from sticking to the baking sheet.
- Large pot: For the baking soda bath. Make sure it’s big enough to hold 8 cups of water.
- Slotted spoon or spider: For removing the pretzel bites from the baking soda bath.
- Small bowl: For the egg wash.
- Pastry brush: For applying the egg wash.
Let’s Get Baking: Step-by-Step Instructions
Alright, my friend, it’s time to put on your apron and get baking! I’m going to break down each step into super easy-to-follow instructions. Remember, don’t be afraid to experiment and have fun. Baking should be a joy, not a chore!
Step 1: Activate the Yeast
First things first, we need to wake up our yeast. In the bowl of your stand mixer (or a large mixing bowl if kneading by hand), combine the warm water and sugar. Sprinkle the yeast over the top and let it sit for 5-10 minutes, until it gets foamy and bubbly. This means the yeast is alive and ready to work its magic!
Pro Tip: If your yeast doesn’t foam up, it’s probably dead. Time to buy some fresh yeast!
Step 2: Make the Dough
Once the yeast is foamy, add the salt and flour to the bowl. If using a stand mixer, use the dough hook attachment and knead on low speed for about 5-7 minutes, until the dough forms a smooth, elastic ball. If kneading by hand, turn the dough out onto a lightly floured surface and knead for 8-10 minutes, until it’s smooth and elastic.
Don’t worry if the dough looks a little sticky at first – that’s normal! Just keep kneading, and it will come together.
Step 3: Let the Dough Rise (Optional, but Recommended)
Now, this step is technically optional, but I highly recommend it. Letting the dough rise for just 30 minutes makes the pretzel bites even softer and chewier. Place the dough in a lightly oiled bowl, turning to coat. Cover the bowl with plastic wrap or a clean kitchen towel and let it rise in a warm place for 30 minutes.
No time to wait? No problem! You can skip this step and move straight to shaping the pretzel bites.
Step 4: Shape the Pretzel Bites
Preheat your oven to 450°F (232°C). Line a baking sheet with parchment paper or a silicone baking mat.
Turn the dough out onto a lightly floured surface. Divide the dough in half. Roll each half into a long rope, about 1 inch thick. Use a knife or pizza cutter to cut the ropes into 1-inch pieces.
Get creative! You can make your pretzel bites bigger or smaller, depending on your preference.
Step 5: The Baking Soda Bath
This is the secret to authentic soft pretzel flavor and that beautiful dark color! In a large pot, bring 8 cups of water to a boil. Carefully add the baking soda. The water will fizz up, so be careful!
Using a slotted spoon or spider, carefully drop the pretzel bites into the boiling water, a few at a time. Let them cook for 30-60 seconds. This step is crucial for that signature pretzel taste. Don’t skip it!
Remove the pretzel bites from the water and place them on the prepared baking sheet. Make sure they’re not touching each other.
Why is the baking soda bath so important? The alkaline environment created by the baking soda bath helps the dough to brown beautifully in the oven and gives it that distinctive pretzel flavor.
Step 6: Egg Wash and Salt
In a small bowl, beat the egg. Brush the top of each pretzel bite with the egg wash. This will give them a beautiful golden-brown color.
Sprinkle the pretzel bites with coarse salt. Don’t be shy with the salt! It’s what makes them so addictive.
Want to add a little extra flavor? Try sprinkling them with everything bagel seasoning, sesame seeds, or even cinnamon sugar!
Step 7: Bake!
Bake the pretzel bites for 10-12 minutes, or until they’re golden brown and cooked through. Keep a close eye on them, as they can burn easily.
Remove the pretzel bites from the oven and let them cool slightly before serving. They’re best enjoyed warm!
Serving Suggestions: The Best Way to Enjoy Your Pretzel Bites
Okay, your Easy Homemade Soft Pretzel Bites – Ready in Minutes! are ready! Now, how should you enjoy them? Here are a few of my favorite ways:
- With cheese dip: Cheddar cheese sauce, beer cheese dip, or even a simple cream cheese dip are all delicious choices.
- With mustard: Stone-ground mustard, honey mustard, or spicy brown mustard are classic pretzel accompaniments.
- With Nutella: For a sweet treat, dip your pretzel bites in Nutella or melted chocolate.
- As a snack: Enjoy them plain, straight from the oven!
- As an appetizer: Serve them at your next party or gathering. They’re always a crowd-pleaser!
Troubleshooting: Common Problems and Solutions
Even with the easiest recipes, sometimes things don’t go according to plan. Don’t worry! Here are a few common problems and their solutions:
- Problem: Dough is too sticky.
- Solution: Add a little more flour, one tablespoon at a time, until the dough is easier to handle.
- Problem: Yeast didn’t foam.
- Solution: Your yeast may be expired. Try again with fresh yeast.
- Problem: Pretzel bites are too pale.
- Solution: Make sure you’re using enough baking soda in the water bath. You can also bake them for a few minutes longer, until they’re golden brown.
- Problem: Pretzel bites are too salty.
- Solution: Use less salt when sprinkling them before baking. You can also use a finer grain salt.
Variations: Spice Things Up!
Once you’ve mastered the basic recipe, feel free to get creative and experiment with different flavors! Here are a few ideas to get you started:
- Cinnamon Sugar Pretzel Bites: After baking, brush the pretzel bites with melted butter and sprinkle with cinnamon sugar.
- Everything Bagel Pretzel Bites: Sprinkle with everything bagel seasoning before baking.
- Jalapeño Cheddar Pretzel Bites: Add diced jalapeños and shredded cheddar cheese to the dough before shaping.
- Garlic Parmesan Pretzel Bites: Brush with garlic butter and sprinkle with grated Parmesan cheese after baking.
The possibilities are endless! Let your imagination run wild and create your own unique pretzel bite flavors.
Storage: Keeping Your Pretzel Bites Fresh
These pretzel bites are best enjoyed fresh, but if you have leftovers, you can store them in an airtight container at room temperature for up to 2 days. To reheat, warm them in the oven or microwave until heated through.
Pro Tip: For the best results, freeze the unbaked pretzel bites and bake them fresh whenever you want them! Simply shape the pretzel bites, place them on a baking sheet, and freeze until solid. Then, transfer them to a freezer bag or container. When ready to bake, follow the baking soda bath and baking instructions as usual, adding a few extra minutes to the baking time.
Final Thoughts: You’ve Got This!
There you have it, my friend! Everything you need to make the most amazing Easy Homemade Soft Pretzel Bites – Ready in Minutes! I know you can do it! Just remember to follow the instructions, have fun, and don’t be afraid to experiment. And most importantly, enjoy the process! Baking should be a joyful experience, not a stressful one. Now go on, get in that kitchen and create some pretzel magic!
Why is a baking soda bath necessary for making soft pretzel bites?
The baking soda bath creates an alkaline environment that helps the dough to brown beautifully in the oven and gives it that distinctive pretzel flavor.
Can I skip the dough rising step to save time?
Yes, you can skip the dough rising step and move straight to shaping the pretzel bites. However, letting the dough rise for 30 minutes makes the pretzel bites even softer and chewier.
What can I do if my yeast doesn’t foam when I activate it?
If your yeast doesn’t foam up after 5-10 minutes in warm water and sugar, it’s likely expired. You should try again with fresh yeast.
How should I store leftover pretzel bites?
Leftover pretzel bites can be stored in an airtight container at room temperature for up to 2 days. They are best enjoyed fresh, but you can reheat them in the oven or microwave until heated through.
Easiest Soft Pretzel Bites Ever
Ingredients
Equipment
Method
- Activate the yeast: In the bowl of a stand mixer or a large mixing bowl, combine warm water and sugar. Sprinkle the yeast over the top and let it sit for 5-10 minutes, until foamy and bubbly.
- Make the dough: Add salt and flour to the bowl. If using a stand mixer, use the dough hook attachment and knead on low speed for 5-7 minutes, until the dough forms a smooth, elastic ball. If kneading by hand, turn the dough out onto a lightly floured surface and knead for 8-10 minutes, until it’s smooth and elastic.
- Let the dough rise (optional): Place the dough in a lightly oiled bowl, turning to coat. Cover the bowl with plastic wrap or a clean kitchen towel and let it rise in a warm place for 30 minutes.
- Preheat the oven to 450°F (232°C). Line a baking sheet with parchment paper or a silicone baking mat.
- Shape the pretzel bites: Turn the dough out onto a lightly floured surface. Divide the dough in half. Roll each half into a long rope, about 1 inch thick. Use a knife or pizza cutter to cut the ropes into 1-inch pieces.
- Prepare the baking soda bath: In a large pot, bring 8 cups of water to a boil. Carefully add the baking soda. Be careful as the water will fizz up.
- Boil the pretzel bites: Using a slotted spoon or spider, carefully drop the pretzel bites into the boiling water, a few at a time. Let them cook for 30-60 seconds.
- Remove the pretzel bites from the water and place them on the prepared baking sheet, ensuring they are not touching each other.
- Egg wash: In a small bowl, beat the egg. Brush the top of each pretzel bite with the egg wash.
- Sprinkle with salt: Sprinkle the pretzel bites with coarse salt.
- Bake: Bake the pretzel bites for 10-12 minutes, or until they’re golden brown and cooked through. Keep a close eye on them, as they can burn easily.
- Remove the pretzel bites from the oven and let them cool slightly before serving. Serve warm.