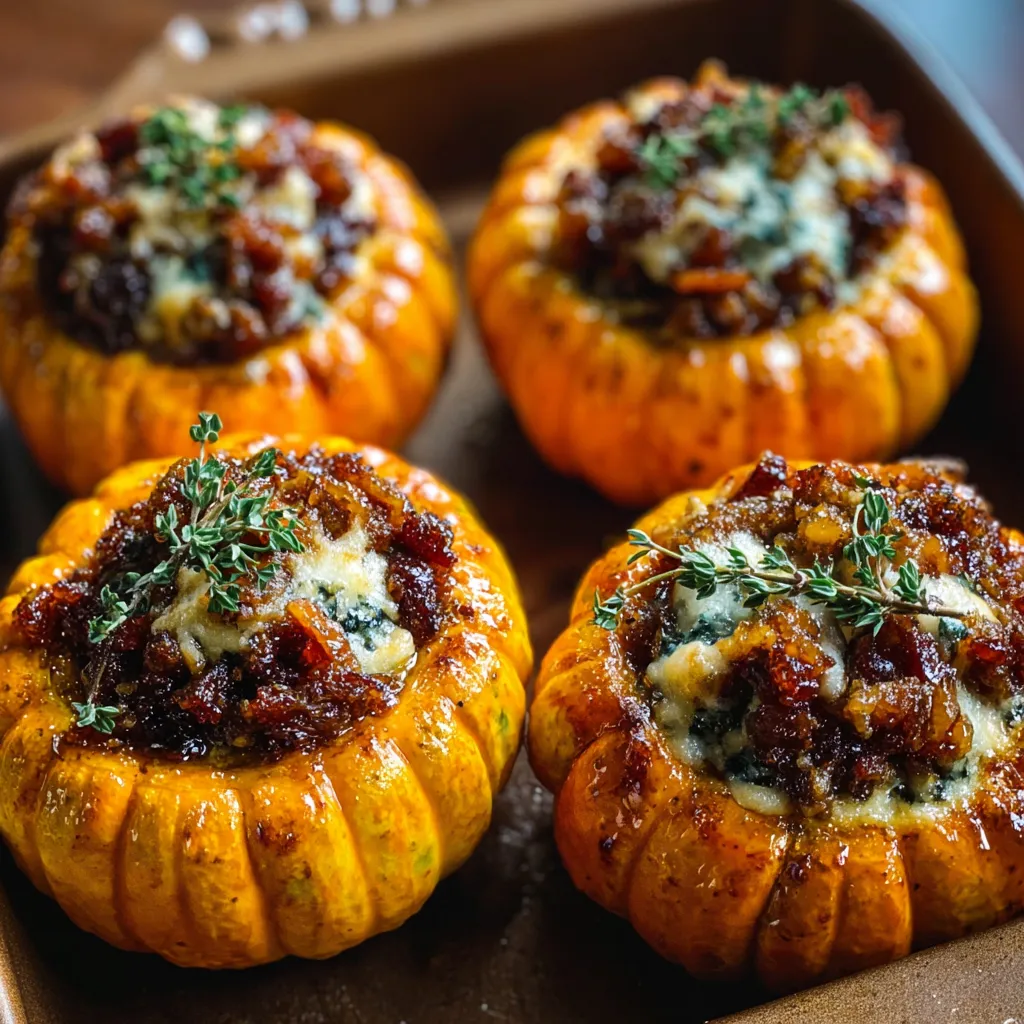
I remember the first time I saw them, these tiny, vibrant orange pumpkins, practically begging to be filled with something delicious; it was at a local farmer’s market, and I instantly knew I had to create something special. The idea of Stuffed Mini Pumpkins just sparked a culinary fire in me, envisioning a savory, comforting filling nestled inside those adorable edible bowls. And believe me, the recipe I’m about to share is not only incredibly easy but will also yield the most impressive and flavorful autumn dish you’ve ever tasted.
Embracing the Magic of Stuffed Mini Pumpkins
Okay, friend, let’s talk about why Stuffed Mini Pumpkins are about to become your new favorite fall tradition. They’re not just a recipe; they’re an experience. Imagine the delighted faces of your family and friends as you present them with their own individual pumpkin filled with warmth and deliciousness. They’re naturally portion-controlled, undeniably festive, and surprisingly versatile. Plus, they’re a fantastic way to sneak in some extra veggies!
Choosing Your Pumpkins: A Guide to the Patch

The key to incredible Stuffed Mini Pumpkins starts right at the beginning: selecting the perfect pumpkins. Here’s what to look for:
- Size Matters: You’re looking for pumpkins that are generally between 4 and 6 inches in diameter. Any smaller, and they’ll be difficult to stuff. Any larger, and they might take too long to cook through. Sugar pumpkins or pie pumpkins are ideal.
- Shape is Key: Choose pumpkins that are relatively round and stable. You want them to sit nicely on a baking sheet without wobbling.
- Inspect for Imperfections: Avoid pumpkins with any soft spots, bruises, or cracks. A healthy pumpkin will be firm and heavy for its size.
- The Stem Knows: A sturdy, intact stem is a sign of a healthy pumpkin.
Ingredients: The Heart of the Stuffing
This is where you can really get creative! The base of this recipe is a savory, comforting filling. I’ll give you my go-to recipe, but feel free to adapt it to your own preferences. You can even think of it as a deconstructed Cabbage Beef Bake but in a pumpkin! Here’s what you’ll need:
- Mini Pumpkins: Of course! 4-6, depending on how many you’re serving.
- Ground Meat: 1 pound of ground beef or ground turkey. I often use turkey for a leaner option.
- Aromatics: 1 medium onion, chopped, and 2-3 cloves of garlic, minced.
- Vegetables: 1 cup of chopped celery, 1 cup of chopped carrots, and 1 cup of chopped mushrooms (optional, but they add a lovely earthy flavor).
- Grain/Binder: 1/2 cup of cooked rice or quinoa. This helps to bind the filling together and add some texture.
- Liquid: 1 cup of chicken broth or vegetable broth.
- Cheese: 1/2 cup of shredded cheddar cheese, mozzarella cheese, or your favorite cheese blend.
- Seasoning: 1 teaspoon of dried Italian herbs, 1/2 teaspoon of salt, 1/4 teaspoon of black pepper, and a pinch of red pepper flakes (optional, for a little heat).
- Oil: 1-2 tablespoons of olive oil or vegetable oil for sautéing.
Ingredient Variations to Consider:
- For a Vegetarian Option: Substitute the ground meat with 1 (15-ounce) can of lentils, drained and rinsed, or crumbled vegetarian sausage.
- Spice it Up: Add a pinch of cayenne pepper or a dash of hot sauce to the filling for an extra kick.
- Get Cheesy: Experiment with different cheeses, such as Gruyere, Parmesan, or pepper jack.
- Add Some Greens: Stir in some chopped spinach, kale, or Swiss chard to the filling for added nutrients.
Preparing the Pumpkins: From Patch to Plate
Now for the fun part! Here’s how to get your pumpkins ready for their delicious filling:
- Preheat the Oven: Preheat your oven to 375°F (190°C).
- Wash and Dry: Thoroughly wash and dry the mini pumpkins.
- Cut the Tops: Using a sharp knife, carefully cut off the tops of the pumpkins, about 1-2 inches from the stem. Think of it like carving a jack-o’-lantern, but smaller and neater.
- Scoop Out the Seeds: Use a spoon to scoop out the seeds and stringy pulp from inside the pumpkins. You can discard the seeds, or you can roast them for a tasty snack!
- Season the Inside: Lightly brush the inside of each pumpkin with olive oil and season with salt and pepper. This will help to enhance the flavor of the pumpkin itself.
- Pre-Bake (Optional but Recommended): Place the pumpkins (and their lids) on a baking sheet and bake for 15-20 minutes, or until they are slightly softened. This step helps to shorten the overall cooking time and ensures that the pumpkin flesh is tender.
Crafting the Flavorful Filling: A Step-by-Step Guide
This filling is so versatile, you can really make it your own. But here’s my tried-and-true method:
- Sauté the Aromatics: Heat the olive oil in a large skillet over medium heat. Add the chopped onion and cook until softened, about 5 minutes. Add the minced garlic and cook for another minute, until fragrant.
- Brown the Meat: Add the ground beef or ground turkey to the skillet and cook, breaking it up with a spoon, until browned. Drain off any excess grease.
- Add the Vegetables: Add the chopped celery, carrots, and mushrooms (if using) to the skillet and cook for 5-7 minutes, until slightly softened.
- Stir in the Rice/Quinoa: Add the cooked rice or quinoa to the skillet and stir to combine.
- Add the Broth and Seasoning: Pour in the chicken broth or vegetable broth and stir in the dried Italian herbs, salt, pepper, and red pepper flakes (if using). Bring to a simmer and cook for 5-10 minutes, or until the liquid has reduced slightly and the flavors have melded together.
- Stir in the Cheese: Remove the skillet from the heat and stir in the shredded cheese until melted and creamy.
Stuffing and Baking: The Grand Finale
Almost there! Now for the best part:
- Fill the Pumpkins: Carefully spoon the filling into the prepared mini pumpkins, packing it in tightly. You can mound the filling slightly above the top of the pumpkin.
- Replace the Lids: Place the pumpkin lids back on top.
- Bake to Perfection: Place the stuffed mini pumpkins on a baking sheet and bake in the preheated oven for 30-40 minutes, or until the pumpkins are tender and the filling is heated through. A fork should easily pierce the pumpkin flesh.
- Broil for Extra Color (Optional): For a golden-brown top, broil the pumpkins for the last 2-3 minutes of cooking, watching carefully to prevent burning.
- Rest and Serve: Let the stuffed mini pumpkins rest for a few minutes before serving. This will allow the filling to set slightly and make them easier to handle.
Serving Suggestions: Elevate the Experience
These Stuffed Mini Pumpkins are delicious on their own, but here are a few ideas to take them to the next level:
- Garnish: Sprinkle with chopped fresh parsley, thyme, or chives.
- Drizzle: Drizzle with a balsamic glaze or a creamy sauce, such as a Parmesan cream sauce.
- Sides: Serve with a side of roasted vegetables, a simple salad, or a crusty loaf of bread for soaking up all those delicious juices. They would pair perfectly with a hearty Vegetable Beef Soup.
Troubleshooting and Tips for Success
Even the best recipes can have their challenges. Here are a few common issues and how to overcome them:
- Pumpkins are Too Hard: If your pumpkins are taking longer to cook than expected, you can tent them with foil to help them soften. You can also add a tablespoon or two of water to the baking sheet to create some steam.
- Filling is Too Dry: If the filling seems dry, add a little more chicken broth or vegetable broth.
- Filling is Too Wet: If the filling is too wet, cook it on the stovetop for a few more minutes to allow the excess liquid to evaporate.
- Pumpkins are Leaking: Sometimes, the pumpkins can leak a little liquid during baking. This is perfectly normal. Just drain off any excess liquid from the baking sheet before serving.
- Stem Burns: Cover the stems with foil while baking to avoid burning.
Make Ahead and Storage Instructions
Stuffed Mini Pumpkins are a great make-ahead option, perfect for busy weeknights or holiday gatherings.
- Make Ahead: You can prepare the filling up to 2 days in advance and store it in the refrigerator. You can also stuff the pumpkins a few hours ahead of time and keep them covered in the refrigerator until ready to bake.
- Storage: Leftover stuffed mini pumpkins can be stored in the refrigerator for up to 3 days. Reheat them in the oven or microwave until heated through.
- Freezing: While you can freeze the stuffed mini pumpkins, the texture of the pumpkin may change slightly upon thawing. If you do freeze them, wrap them individually in plastic wrap and then foil. Thaw them in the refrigerator overnight before reheating.
Variations to Tickle Your Taste Buds
The beauty of this recipe lies in its adaptability. Here are some fun variations to try:
- Italian Sausage and Rice: Use Italian sausage instead of ground beef and add some Parmesan cheese and sun-dried tomatoes to the filling. This would give it the same warm feeling of Spaghetti Squash Au Gratin.
- Mexican Fiesta: Use ground turkey or beef seasoned with taco seasoning and add some black beans, corn, and salsa to the filling. Top with shredded cheddar cheese and a dollop of sour cream.
- Mediterranean Delight: Use ground lamb or beef seasoned with Greek herbs and add some feta cheese, olives, and chopped tomatoes to the filling.
- Harvest Vegetable Medley: Combine roasted butternut squash, Brussels sprouts, and cranberries with quinoa and a sprinkle of goat cheese for a vegetarian feast.
- Sausage and Apple: Try adding diced apples and crumbled sausage to the filling, seasoned with sage and thyme, for a sweet and savory combination reminiscent of Sausage And Sweet Potatoes.
Why These Stuffed Mini Pumpkins Are a Must-Try
I hope I’ve convinced you to give these Stuffed Mini Pumpkins a try. They’re more than just a recipe; they’re a celebration of fall flavors, a conversation starter, and a guaranteed crowd-pleaser. They’re perfect for a cozy weeknight dinner, a festive holiday gathering, or a special occasion. They also are the perfect side dish to a Ranchy Sausage Potato dinner. And trust me, once you make them, you’ll be hooked!
So, grab your pumpkins, gather your ingredients, and get ready to create some culinary magic. You got this!
What size mini pumpkins are best for stuffing?
Pumpkins that are generally between 4 and 6 inches in diameter are ideal. Sugar pumpkins or pie pumpkins are recommended.
Can the stuffed mini pumpkins be made ahead of time?
Yes, you can prepare the filling up to 2 days in advance and store it in the refrigerator. You can also stuff the pumpkins a few hours ahead of time and keep them covered in the refrigerator until ready to bake.
What are some vegetarian options for the filling?
You can substitute the ground meat with 1 (15-ounce) can of lentils, drained and rinsed, or crumbled vegetarian sausage.
How should I store leftover stuffed mini pumpkins?
Leftover stuffed mini pumpkins can be stored in the refrigerator for up to 3 days. Reheat them in the oven or microwave until heated through.
Stuffed Mini Pumpkins
Ingredients
Equipment
Method
- Preheat oven to 375°F (190°C).
- Wash and dry the mini pumpkins.
- Cut off the tops of the pumpkins, about 1-2 inches from the stem.
- Scoop out the seeds and stringy pulp from inside the pumpkins.
- Lightly brush the inside of each pumpkin with olive oil and season with salt and pepper.
- Place the pumpkins (and their lids) on a baking sheet and bake for 15-20 minutes, or until they are slightly softened.
- Heat the olive oil in a large skillet over medium heat.
- Add the chopped onion and cook until softened, about 5 minutes.
- Add the minced garlic and cook for another minute, until fragrant.
- Add the ground beef or ground turkey to the skillet and cook, breaking it up with a spoon, until browned. Drain off any excess grease.
- Add the chopped celery, carrots, and mushrooms (if using) to the skillet and cook for 5-7 minutes, until slightly softened.
- Add the cooked rice or quinoa to the skillet and stir to combine.
- Pour in the chicken broth or vegetable broth and stir in the dried Italian herbs, salt, pepper, and red pepper flakes (if using).
- Bring to a simmer and cook for 5-10 minutes, or until the liquid has reduced slightly and the flavors have melded together.
- Remove the skillet from the heat and stir in the shredded cheese until melted and creamy.
- Carefully spoon the filling into the prepared mini pumpkins, packing it in tightly.
- Place the pumpkin lids back on top.
- Place the stuffed mini pumpkins on a baking sheet and bake in the preheated oven for 30-40 minutes, or until the pumpkins are tender and the filling is heated through.
- For a golden-brown top, broil the pumpkins for the last 2-3 minutes of cooking, watching carefully to prevent burning.
- Let the stuffed mini pumpkins rest for a few minutes before serving.