I remember the first time I tried to bake a chocolate cake from scratch. It was for my dad’s birthday, and the result was… well, let’s just say it looked like a volcanic eruption in cake form. It was dense, dry, and definitely not worthy of a celebration. But, being the determined baker I am, I embarked on a quest to find the perfect recipe, one that would deliver the most amazing Ultimate Chocolate Cake — Decadence in Every Bite. And guess what? After countless attempts, tweaking, and taste tests (the best part!), I finally cracked the code. Today, I’m sharing all my secrets for the most amazing Ultimate Chocolate Cake — Decadence in Every Bite you’ll ever make!
The Journey to Chocolate Cake Perfection

Okay, my friend, let’s dive into the wonderful world of chocolate cake! We’re not just baking a cake; we’re creating an experience. We’re building a masterpiece that will wow your family, impress your friends, and maybe even win you some serious baking bragging rights. This isn’t just *any* chocolate cake; this is *the* chocolate cake. We’re going for intensely chocolatey, incredibly moist, and melt-in-your-mouth delicious. Are you ready? Let’s get started!
Why This Recipe Rocks
You might be thinking, “Another chocolate cake recipe? What makes this one so special?” Let me tell you! This recipe isn’t just a list of ingredients; it’s a carefully curated blend of techniques and ingredients that work together in perfect harmony. We’re using a combination of cocoa powder and melted chocolate for a deep, rich flavor. We’re adding buttermilk for tenderness and moisture. And we’re using a special method to ensure a perfectly even crumb. Trust me; you’ll taste the difference.
Ingredients: The Building Blocks of Decadence
Before we even think about preheating the oven, let’s make sure we have all our ingredients ready to go. Mise en place, as the fancy chefs say! This will make the whole baking process much smoother and less stressful. Here’s what you’ll need:
- For the Cake:
- 2 cups (250g) all-purpose flour
- 2 cups (400g) granulated sugar
- ¾ cup (75g) unsweetened cocoa powder (I prefer Dutch-process for a richer flavor)
- 1 ½ teaspoons baking powder
- 1 ½ teaspoons baking soda
- 1 teaspoon salt
- 1 cup (240ml) buttermilk, room temperature
- ½ cup (120ml) vegetable oil
- 2 large eggs, room temperature
- 2 teaspoons vanilla extract
- 1 cup (240ml) freshly brewed hot coffee (yes, coffee!)
- 4 ounces (115g) unsweetened chocolate, melted and cooled slightly
- For the Chocolate Frosting:
- 1 cup (2 sticks or 226g) unsalted butter, softened
- 3 cups (360g) powdered sugar
- ¾ cup (70g) unsweetened cocoa powder
- ½ cup (120ml) milk
- 1 teaspoon vanilla extract
- Pinch of salt
A few notes on ingredients:
- Cocoa Powder: As I mentioned, Dutch-process cocoa powder will give you a deeper, more intense chocolate flavor. But if you only have natural cocoa powder on hand, that’s perfectly fine! Just be aware that the flavor might be slightly different.
- Buttermilk: Buttermilk is the secret ingredient to a moist and tender cake. If you don’t have buttermilk, you can make a quick substitute by adding 1 tablespoon of lemon juice or white vinegar to a liquid measuring cup and then filling it with milk to the 1-cup line. Let it sit for 5 minutes before using.
- Coffee: Don’t worry; your cake won’t taste like coffee! The hot coffee intensifies the chocolate flavor. It’s a trick that many professional bakers use.
- Room Temperature Ingredients: This is super important! Room temperature ingredients emulsify better, resulting in a smoother batter and a more even crumb. Take your butter, eggs, and buttermilk out of the fridge about 30 minutes before you start baking.
Let’s Bake! The Step-by-Step Guide
Alright, let’s get down to business! This recipe is straightforward, but following the steps carefully will ensure a perfect outcome.
Step 1: Preheat and Prep
Preheat your oven to 350°F (175°C). Grease and flour two 9-inch round cake pans. You can also line the bottoms with parchment paper rounds for extra insurance against sticking. I like to grease, then flour, then put the parchment rounds in. Overkill? Maybe. But worth it for perfect cake release!
Step 2: Dry Ingredients Unite
In a large bowl, whisk together the flour, sugar, cocoa powder, baking powder, baking soda, and salt. Make sure everything is well combined. This ensures that the leavening agents are evenly distributed, which is crucial for a light and airy cake.
Step 3: Wet Ingredients Join the Party
In a separate bowl, whisk together the buttermilk, oil, eggs, and vanilla extract. Then, pour the wet ingredients into the dry ingredients and mix until just combined. Be careful not to overmix! Overmixing can develop the gluten in the flour, resulting in a tough cake.
Step 4: Coffee and Chocolate Power-Up
Gradually add the hot coffee to the batter, mixing until just combined. Then, gently fold in the melted chocolate. The batter will be quite thin; don’t worry, that’s normal!
Step 5: Divide and Conquer
Divide the batter evenly between the prepared cake pans. I like to use a kitchen scale to ensure that both layers are the same thickness. This will help them bake evenly.
Step 6: Bake to Perfection
Bake for 30-35 minutes, or until a toothpick inserted into the center comes out clean or with a few moist crumbs attached. Start checking for doneness around 30 minutes. Every oven is different, so yours might take a little longer or shorter.
Step 7: Cool Down
Let the cakes cool in the pans for 10 minutes before inverting them onto a wire rack to cool completely. Make sure the cakes are completely cool before frosting. Warm cakes will melt the frosting, resulting in a messy situation.
Frosting: The Crowning Glory
Now that our cakes are cooling, let’s move on to the frosting! This chocolate buttercream frosting is rich, creamy, and utterly irresistible.
Step 1: Cream the Butter
In a large bowl, beat the softened butter with an electric mixer until light and fluffy. This usually takes about 3-5 minutes. Make sure your butter is truly softened, but not melted. It should be able to hold its shape but yield easily when pressed.
Step 2: Add the Sugar and Cocoa
Gradually add the powdered sugar and cocoa powder, beating on low speed until combined. Start with a small amount of sugar and cocoa, then gradually add the rest. This will prevent a powdered sugar cloud from forming in your kitchen. Trust me on this one!
Step 3: Milk and Vanilla Magic
Add the milk, vanilla extract, and salt, and beat on medium speed until smooth and creamy. If the frosting is too thick, add a little more milk. If it’s too thin, add a little more powdered sugar. You want a frosting that is spreadable but still holds its shape.
Assembly: The Grand Finale
Okay, the cakes are cool, the frosting is ready, and it’s time to assemble our masterpiece! This is where the magic happens.
Step 1: Level Up
If your cake layers are uneven, use a serrated knife to level the tops. This will ensure that your cake is stable and looks professional.
Step 2: Frosting Time
Place one cake layer on a serving plate or cake stand. Spread a generous layer of frosting over the top. Then, place the second cake layer on top of the frosting. Frost the top and sides of the cake with the remaining frosting. You can use a spatula, an offset spatula, or even a butter knife to spread the frosting. Get creative!
Step 3: Decorate (Optional, But Highly Recommended!)
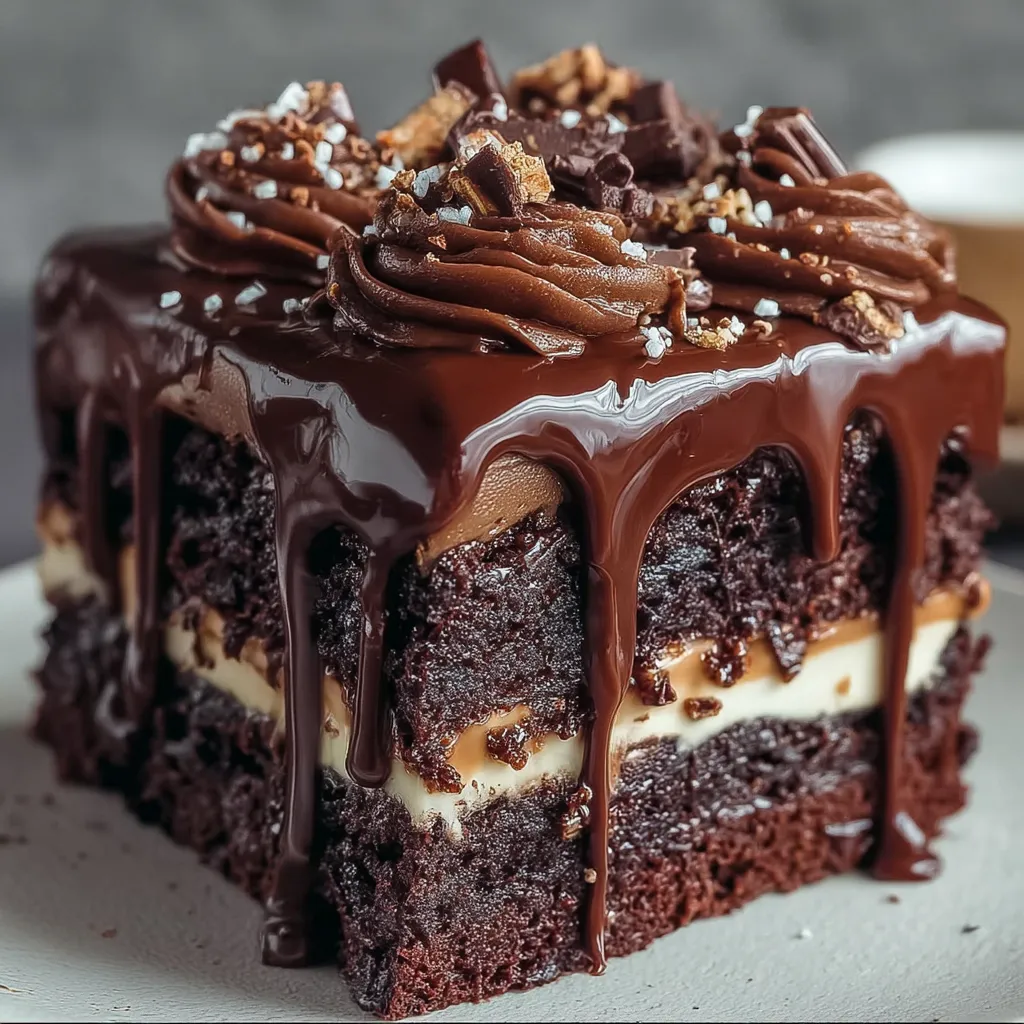
Now comes the fun part: decorating! You can keep it simple with a swirl of frosting, or you can go all out with sprinkles, chocolate shavings, fresh berries, or whatever your heart desires. I personally love adding a sprinkle of sea salt on top to enhance the chocolate flavor. The possibilities are endless!
Tips and Tricks for Chocolate Cake Success
Okay, before you rush off to the kitchen, here are a few extra tips and tricks to help you bake the perfect chocolate cake:
- Don’t Overbake: Overbaking is the number one reason why cakes turn out dry. Start checking for doneness a few minutes before the recommended baking time.
- Use an Oven Thermometer: Oven temperatures can vary, so using an oven thermometer will ensure that your oven is at the correct temperature.
- Cool Cakes Completely: As I mentioned earlier, make sure the cakes are completely cool before frosting. Warm cakes will melt the frosting and make it difficult to work with.
- Chill the Frosting: If your frosting is too soft, chill it in the refrigerator for 15-20 minutes before using. This will make it easier to spread.
- Practice Makes Perfect: Don’t be discouraged if your first attempt isn’t perfect. Baking is a learning process, and the more you practice, the better you’ll become.
Storage Instructions
To keep your Ultimate Chocolate Cake – Decadence in Every Bite fresh, store it in an airtight container at room temperature for up to 3 days, or in the refrigerator for up to a week. If you’re storing it in the refrigerator, let it come to room temperature before serving for the best flavor and texture.
Enjoy Your Decadent Creation!
There you have it! My ultimate chocolate cake recipe, complete with all the tips and tricks I’ve learned over the years. I truly hope you enjoy making (and eating!) this cake as much as I do. It’s perfect for birthdays, holidays, or any special occasion. Or, let’s be honest, just because you deserve a slice of decadent chocolatey goodness. Go ahead, indulge! You’ve earned it.
Remember, baking is all about having fun and experimenting. Don’t be afraid to get creative and put your own spin on this recipe. And most importantly, don’t forget to share your delicious creation with the people you love! Happy baking!
What makes this chocolate cake recipe different from other chocolate cake recipes?
This recipe uses a combination of cocoa powder and melted chocolate for a deep, rich flavor, buttermilk for tenderness and moisture, and a special method to ensure a perfectly even crumb.
What can I use as a substitute if I don’t have buttermilk?
You can make a quick buttermilk substitute by adding 1 tablespoon of lemon juice or white vinegar to a liquid measuring cup and then filling it with milk to the 1-cup line. Let it sit for 5 minutes before using.
Why does the recipe call for hot coffee?
The hot coffee is used to intensify the chocolate flavor of the cake. The cake will not taste like coffee.
How should I store the Ultimate Chocolate Cake?
Store the cake in an airtight container at room temperature for up to 3 days, or in the refrigerator for up to a week. Let it come to room temperature before serving if refrigerated.
Ultimate Chocolate Cake Decadence
Ingredients
Equipment
Method
- Preheat oven to 350°F (175°C). Grease and flour two 9-inch round cake pans and line the bottoms with parchment paper rounds.
- In a large bowl, whisk together the flour, sugar, cocoa powder, baking powder, baking soda, and salt.
- In a separate bowl, whisk together the buttermilk, oil, eggs, and vanilla extract.
- Pour the wet ingredients into the dry ingredients and mix until just combined. Do not overmix.
- Gradually add the hot coffee to the batter, mixing until just combined.
- Gently fold in the melted chocolate. The batter will be thin.
- Divide the batter evenly between the prepared cake pans.
- Bake for 30-35 minutes, or until a toothpick inserted into the center comes out clean or with a few moist crumbs attached.
- Let the cakes cool in the pans for 10 minutes before inverting them onto a wire rack to cool completely.
- For the frosting, beat the softened butter with an electric mixer until light and fluffy (3-5 minutes).
- Gradually add the powdered sugar and cocoa powder, beating on low speed until combined.
- Add the milk, vanilla extract, and salt, and beat on medium speed until smooth and creamy. Adjust milk or powdered sugar to reach desired consistency.
- If your cake layers are uneven, use a serrated knife to level the tops.
- Place one cake layer on a serving plate or cake stand. Spread a generous layer of frosting over the top.
- Place the second cake layer on top of the frosting. Frost the top and sides of the cake with the remaining frosting.
- Decorate as desired.