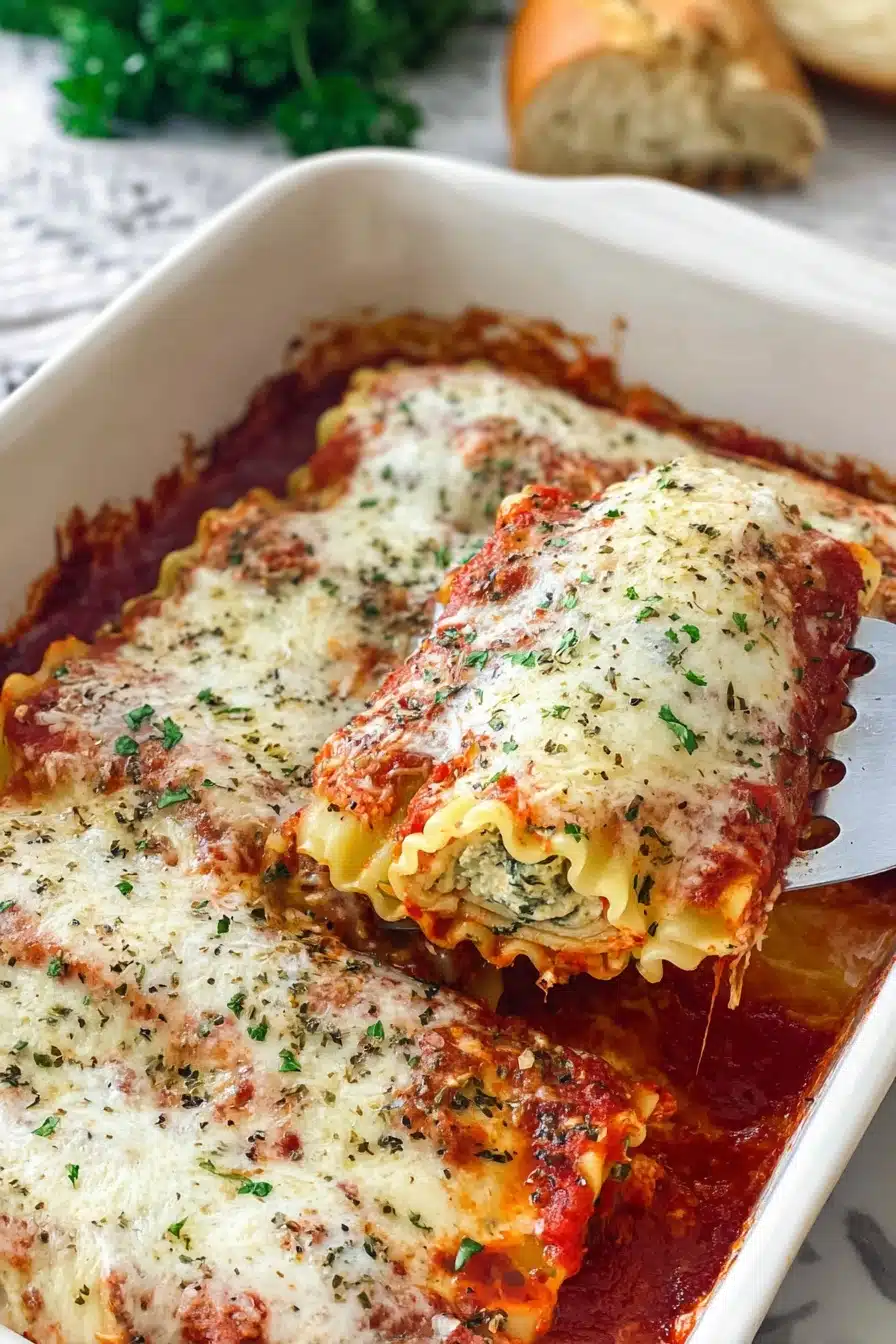
There’s something about a pan of stuffed manicotti coming out of the oven, sauce bubbling up around the edges and cheese golden on top, that makes dinner feel like an occasion even on a regular weeknight. This meat stuffed manicotti bake takes the classic cheese-only version and adds seasoned ground beef to the ricotta filling, making it substantial enough to stand completely on its own as a meal.
The prep is straightforward once you have your workflow down, and the results are the kind of comfort food that holds up well for leftovers and actually tastes better the next day. It’s a great recipe for feeding a hungry family, and it freezes beautifully if you want to get ahead on meal prep.
Why You’ll Love This Meat Stuffed Manicotti Bake
The filling here is the real difference-maker. Combining lean ground beef with ricotta, mozzarella, Parmesan, and egg gives you something that’s creamy and savory at the same time, and it holds together inside the pasta tube rather than sliding out when you cut into it. The egg is what binds everything and keeps the filling cohesive after baking.
Covering the shells completely with marinara before baking is what prevents the pasta from drying out or going crunchy on top. The foil-on, foil-off baking method gives you fully cooked, tender pasta with a properly browned and bubbly cheese top. This dish also doubles beautifully for a crowd, reheats well, and can be assembled a day ahead and baked when you’re ready, which makes it one of the most practical pasta dinners in the rotation.
Ingredients for Meat Stuffed Manicotti Bake
I recommend using full-fat ricotta here if you want the richest, creamiest result. Part-skim works well too and is my go-to when I want to keep things a little lighter without losing the texture. Here’s the full list:
The Pasta: 1 package (8 oz) manicotti shells, approximately 12 to 14 shells
The Filling: 1 lb lean ground beef, or a mix of beef and Italian sausage 1 small yellow onion, finely diced 2 cloves garlic, minced 1 container (15 oz) ricotta cheese 2 cups shredded mozzarella cheese, divided 1/2 cup grated Parmesan cheese 1 large egg, lightly beaten 1 teaspoon dried oregano 1/2 teaspoon salt 1/4 teaspoon black pepper
The Sauce: 1 jar (24 oz) marinara or spaghetti sauce
For the ground beef, lean is the better choice here since excess fat in the filling can make the ricotta mixture greasy and cause it to separate during baking. A 50/50 mix of ground beef and mild Italian sausage is my favorite variation, as the sausage adds fennel and herb notes that complement the ricotta beautifully. For the marinara, use whatever jarred sauce you enjoy eating on its own. The sauce flavor carries through the whole dish, so a good quality jar makes a noticeable difference.
How to Make Meat Stuffed Manicotti Bake
The key to this recipe is timing your steps so the meat mixture has time to cool before you combine it with the ricotta. Adding hot meat to cold ricotta and egg creates steam that can affect the filling texture and scramble the egg. A 5 to 10 minute rest after browning the beef is all you need.
- Preheat your oven to 350°F and lightly grease a 9×13-inch baking dish. Having the dish ready before you start stuffing the shells makes the assembly process much smoother.
- Bring a large pot of salted water to a boil. Cook the manicotti shells according to package directions, but pull them 2 minutes early. They should be pliable but still have some firmness. Drain immediately and rinse with cold water to stop the cooking. Lay them out on a lightly oiled surface or baking sheet so they don’t stick together while you prep the filling.
- In a large skillet over medium heat, cook the ground beef and diced onion together, breaking the meat into small pieces, until no longer pink. Add the minced garlic and cook for 1 more minute. Drain any excess grease and let the mixture cool for 5 to 10 minutes.
- In a large bowl, combine the cooled meat mixture, ricotta, 1 cup of the mozzarella, Parmesan, egg, oregano, salt, and pepper. Stir until everything is evenly combined into a thick, cohesive filling.
- To stuff the shells, use either a small spoon or a gallon-sized zip-top bag with one corner snipped off to pipe the filling in from both ends. In my experience, the bag method is significantly faster and reduces the risk of tearing the shells. Fill each shell until the filling is just visible at both openings.
- Spread about 1 cup of the marinara across the bottom of your prepared baking dish. Arrange the stuffed shells in a single layer over the sauce.
- Pour the remaining marinara over the shells, making sure every shell is covered. Any exposed pasta will dry out and go tough in the oven. Scatter the remaining 1 cup of mozzarella evenly over the top.
- Cover the dish tightly with foil and bake for 30 minutes. Remove the foil and bake for another 10 minutes until the cheese is bubbly and starting to turn golden in spots.
- Let the dish rest for 5 to 10 minutes before serving. This allows the filling to set so the shells hold their shape when you plate them.
Pro tip: If your manicotti shells feel like they’re on the verge of tearing while stuffing, they were cooked a touch too long. Next time, shave another minute off the boil time. Slightly undercooked shells are always easier to work with and finish perfectly in the oven.
What to Serve with Meat Stuffed Manicotti Bake
This is a rich, filling pasta bake, so the best sides are ones that bring some lightness and contrast to the plate.
Garlic Bread: The classic pairing and for good reason. A crispy slice of garlic bread is ideal for catching extra marinara from the pan and rounds out the meal without any additional effort.
Caesar Salad: The sharp, tangy dressing of a Caesar cuts right through the richness of the cheese filling and helps balance the overall meal. Keep it simple with romaine, shaved Parmesan, and croutons.
Roasted Zucchini: Slice zucchini into half-moons, toss with olive oil and Italian seasoning, and roast at 400°F for 20 minutes. It shares the Italian flavor profile of the manicotti and adds a vegetable element without competing for attention.
Steamed Broccoli: A simple, no-fuss side that adds color and freshness. A squeeze of lemon over the top keeps it bright against the heavier pasta bake.
Caprese Salad: Fresh tomatoes, mozzarella, and basil with a drizzle of olive oil is a light, elegant side that makes the dinner feel a little more special without any cooking required.

Pro Tips & Variations
Make it ahead: Assemble the entire dish, cover tightly, and refrigerate for up to 24 hours before baking. Add 10 minutes to the covered bake time if going straight from the fridge to the oven.
Freeze before baking: This recipe is an excellent freezer meal. Assemble fully, wrap tightly in two layers of foil, and freeze for up to 3 months. Thaw overnight in the refrigerator before baking as directed.
Add spinach: Stir 1 cup of chopped, cooked spinach that has been thoroughly squeezed dry into the ricotta mixture. It blends right in and adds color and nutrition without changing the flavor or texture noticeably.
Spicy variation: Swap the lean ground beef for hot Italian sausage and use a spicy arrabbiata sauce in place of the marinara. The heat level builds nicely through the bake.
Cheese swap: A mix of mozzarella and fontina in the topping creates an even creamier, more complex cheese pull. Fontina melts exceptionally well and adds a slightly nutty flavor.
Storage & Reheating Tips
Store leftover manicotti bake in an airtight container in the refrigerator for up to 4 days. I find it actually tastes better on day two once the filling has had time to settle and the flavors have melded. To reheat, place a portion in an oven-safe dish, add a spoonful of marinara or a splash of water, cover with foil, and warm at 325°F for 20 minutes. The microwave works in a pinch on medium power with a damp paper towel over the top to prevent drying out.
For freezing, assemble the dish fully but do not bake. Wrap tightly in foil and freeze for up to 3 months. Thaw completely in the refrigerator overnight before baking as directed, adding about 10 minutes to the initial covered bake time.
Common Questions
Can I use no-boil manicotti shells? Some brands offer oven-ready manicotti shells, and they do work in this recipe. Make sure every shell is completely submerged in sauce before covering, as they rely entirely on the surrounding moisture to cook through. Results can vary slightly by brand, so read the package instructions carefully.
My filling is too loose to pipe. What went wrong? This usually means the meat wasn’t drained thoroughly enough, or the ricotta has a high moisture content. Drain the meat well after browning and, if your ricotta seems watery, spoon it into a fine mesh strainer and let it drain for 10 to 15 minutes before mixing.
Can I assemble this the night before? Yes, and it’s one of the best things about this recipe. Assemble completely, cover tightly with foil, and refrigerate. Bake the following day, adding about 10 minutes to the covered bake time since you’re starting from cold.
How do I know when the shells are cooked through? A sharp knife or skewer should slide through the pasta with no resistance. The shells will also look slightly softened and the sauce around them will be bubbling actively before you remove the foil.
Can I double this recipe? Easily. Use two 9×13 baking dishes and rotate them on the oven racks halfway through the covered bake time for even heat. The baking time stays the same.
This meat stuffed manicotti bake is the kind of dinner that earns requests for repeats. It’s satisfying, practical, and comes together with simple ingredients that most people already have on hand. Once you have the stuffing technique down, it goes from prep to table with very little stress. Give it a try and don’t skip the resting time before serving.
Meat Stuffed Manicotti Bake
Ingredients
Equipment
Method
- Preheat the oven to 350°F (175°C). Lightly grease a 9×13-inch baking dish and set aside.
- Cook the manicotti shells in a large pot of salted boiling water according to package directions, removing them 2 minutes before the recommended time. They should be al dente and slightly firm. Drain, rinse with cold water, and lay out on a lightly oiled surface to prevent sticking.
- In a large skillet over medium heat, cook the ground beef and diced onion, breaking the meat into small pieces, until no longer pink. Add the minced garlic and cook for 1 more minute. Drain any excess grease and let the mixture cool for 5 to 10 minutes.
- In a large bowl, combine the cooled meat mixture, ricotta, 1 cup of the mozzarella, Parmesan, egg, oregano, salt, and pepper. Stir until fully combined into a thick, cohesive filling.
- Transfer the filling to a gallon-sized zip-top bag and snip one corner off. Pipe the filling into both ends of each manicotti shell until full. Alternatively, use a small spoon to fill the shells from both ends.
- Spread about 1 cup of the marinara across the bottom of the prepared baking dish. Arrange the stuffed shells in a single layer over the sauce.
- Pour the remaining marinara over the shells, ensuring every shell is fully covered. Scatter the remaining 1 cup of mozzarella evenly over the top.
- Cover the baking dish tightly with foil and bake for 30 minutes. Remove the foil and bake for an additional 10 minutes until the cheese is bubbly and golden.
- Remove from the oven and let the dish rest for 5 to 10 minutes before serving to allow the filling to set.