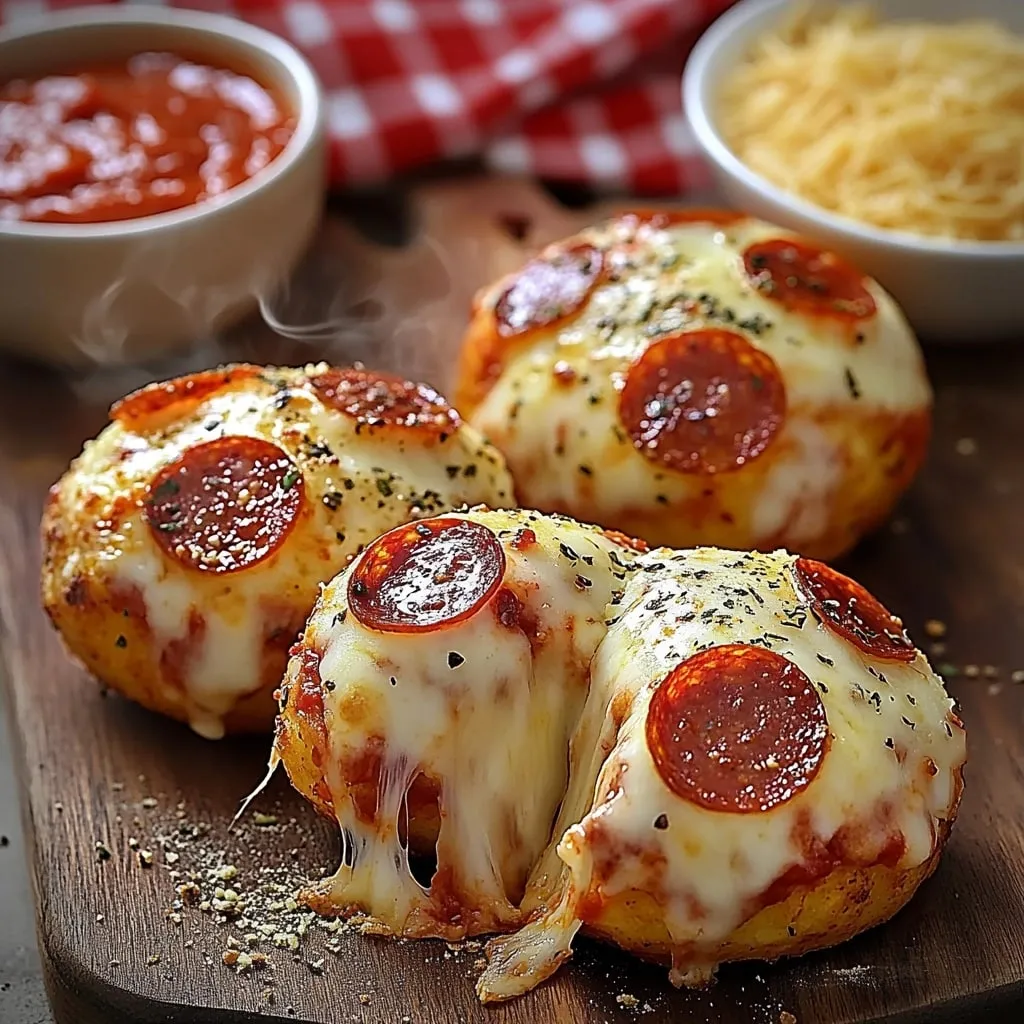
Pizza bombs take everything you love about pizza—melted mozzarella, pepperoni, tangy sauce—and wrap it in a golden, buttery package that’s perfect for grabbing with your hands. These Easy Pepperoni Pizza Bombs deliver on that promise with minimal effort, using refrigerated biscuit dough as a shortcut that turns what could be a complicated project into a thirty-minute dinner or appetizer. The garlic butter glaze brushed on while they’re still hot creates a glossy, aromatic finish that makes them irresistible.
What makes these pizza bombs work so well is the contrast between textures. The outside bakes up golden and slightly crispy from the oven’s dry heat, while the inside stays soft and pillowy with pockets of molten mozzarella and pizza sauce. The pepperoni releases its oils during baking, flavoring everything around it. That final brush of garlic-herb butter adds a punch of savory richness that ties the whole bite together.
I make these when I want something fun and satisfying without actual pizza-making effort. Ten minutes of assembly—splitting biscuits, adding filling, sealing—and twenty minutes in the oven produces sixteen hot, cheesy bombs that work equally well as a casual family dinner or a party appetizer. Serve them with warm marinara for dipping and watch them disappear.
Why You’ll Love These Easy Pepperoni Pizza Bombs
Refrigerated biscuit dough is the key ingredient that makes this recipe accessible on a weeknight. No yeast, no rising time, no kneading—just pop open the tube and you’re ready to assemble. Pillsbury Grands work particularly well because they’re thick enough to split into two layers, giving you sixteen bombs from one tube instead of eight.
The seam-side-down placement is crucial for keeping the filling inside during baking. When the pinched seam faces down against the baking sheet, the weight of the bomb itself presses the seal closed as the dough expands. Seam-side up creates opportunities for cheese to leak out, leaving you with delicious but deflated bombs.
Cutting the mozzarella into cubes rather than shredding it creates better texture inside each bomb. A cube of cheese melts into a molten pocket that stays mostly contained, while shredded cheese can spread out too much and leak through seams. The cube also provides that satisfying cheese pull when you bite into a hot bomb.
The garlic butter glaze applied immediately after baking soaks into the hot dough and creates flavor that goes beyond plain baked biscuits. The butter also adds shine and richness while the Parmesan contributes salty, nutty depth. This finishing step transforms the bombs from good to genuinely crave-worthy.
Ingredients for Easy Pepperoni Pizza Bombs
I use Pillsbury Grands Buttermilk Biscuits specifically because they’re the right thickness and have flaky layers that separate easily. The eight-count tube gives you sixteen bombs when split. Other biscuit brands work, but thinner varieties may not seal as well or provide enough dough to encase the filling properly.
The Dough:
- 1 tube (16.3 oz) refrigerated buttermilk biscuit dough (like Pillsbury Grands)
The Filling:
- ½ cup pizza sauce (plus more for dipping)
- ½ cup pepperoni slices (mini pepperoni or regular slices cut into quarters)
- 4 oz mozzarella cheese, cut into 16 small cubes (about ½-inch each)
The Garlic Butter Glaze:
- ¼ cup unsalted butter, melted
- ½ teaspoon garlic powder (or garlic salt)
- 1 teaspoon Italian seasoning
- 2 tablespoons grated Parmesan cheese
Optional Garnish:
- Fresh parsley, finely chopped
Ingredient Notes:
Low-moisture mozzarella is the right choice here rather than fresh mozzarella. Fresh mozzarella contains too much water, which releases during baking and can make the dough soggy or cause leaks. Block mozzarella labeled “low-moisture” or “part-skim” provides that classic cheese pull without excess liquid.
The pizza sauce needs to be thick rather than watery. If your sauce looks thin, simmer it for five minutes on the stovetop to reduce it before using. Thin sauce leaks out more easily and can make the bottom of the dough soggy during baking.
Mini pepperoni work better than full-sized slices for distribution and ease of assembly. If using regular pepperoni, cut each slice into quarters so you can fit several pieces into each bomb without overwhelming the filling or making it difficult to seal.
Italian seasoning in the garlic butter typically contains a blend of oregano, basil, thyme, and sometimes marjoram. This pre-mixed seasoning saves time and ensures balanced herb flavor. If you don’t have it, use half a teaspoon of dried oregano and a quarter teaspoon of dried basil.
How to Make Easy Pepperoni Pizza Bombs
The assembly technique is straightforward but requires attention to sealing. Each bomb needs to be properly closed to prevent cheese explosions in the oven.
- Preheat your oven to 375°F and lightly grease a large baking sheet or oven-safe cast iron skillet with cooking spray. The skillet creates a more crowded environment that encourages the bombs to rise upward rather than spreading outward, creating taller, more dramatic bombs.
- Open the tube of biscuit dough and separate the eight biscuits. Each Grands biscuit has visible layers that you can pull apart horizontally, splitting one biscuit into two thinner rounds. Gently peel them apart to create sixteen pieces total. If your biscuits don’t split easily, you can roll each one thinner and cut it in half with a knife.
- On a clean work surface, flatten each piece of dough with your hands into a circle about three to four inches in diameter and roughly an eighth of an inch thick. Don’t roll them with a rolling pin—your hands work better for maintaining the flaky layers. The dough should be thin enough to stretch around the filling but thick enough to seal properly.
- Working with one flattened dough circle at a time, place about one teaspoon of pizza sauce in the center. Add three to four pieces of pepperoni on top of the sauce, then place one cube of mozzarella cheese in the middle of the pepperoni. Don’t overfill—more filling makes sealing harder and increases the chance of leaks.
- Bring the edges of the dough circle up and over the filling, gathering them at the top like a little bundle. Pinch all the seams together firmly, then roll the ball gently between your palms to seal everything and create a smooth sphere. Make sure there are no gaps or holes—these are where cheese will escape during baking.
- Place each sealed bomb seam-side down on the prepared baking sheet, spacing them about an inch apart. They’ll expand slightly during baking, so give them a bit of room. The seam facing down is crucial—it keeps everything sealed as the dough rises and bakes.
- Slide the baking sheet into the preheated oven and bake for fifteen to twenty minutes until the tops are deep golden brown. The bombs should look puffy and cooked through. If they’re pale or doughy-looking, give them another two to three minutes.
- While the bombs bake, whisk together the melted butter, garlic powder, Italian seasoning, and grated Parmesan in a small bowl. The mixture should be smooth and fragrant.
- The moment you pull the baking sheet from the oven, brush the hot bombs generously with the garlic butter glaze. Use all of it—the hot dough will absorb the butter and the flavors will intensify. Sprinkle with chopped fresh parsley if using.
- Let the bombs cool for about three minutes before serving—the cheese inside is molten and will burn your mouth if you bite in immediately. Serve warm with a bowl of marinara or ranch for dipping.
The most common mistake is not sealing the dough thoroughly, which causes cheese to leak out during baking. Another issue is using too much filling, which makes it impossible to seal properly. A little restraint with the filling creates better, more contained results.
What to Serve with Easy Pepperoni Pizza Bombs
Pizza bombs work as a complete casual dinner or as an appetizer before a larger meal. Certain sides can round them out into a more substantial spread.
Warm Marinara Sauce: Essential for dipping—heat store-bought marinara or use extra pizza sauce warmed in a small pot. The tangy tomato sauce complements the rich, cheesy bombs and provides moisture for each bite.
Ranch Dressing: Cool, creamy ranch provides a different dipping experience than marinara and is a classic pairing with pizza flavors. The herbs in ranch echo the Italian seasoning in the garlic butter.
Simple Green Salad: A crisp salad with Italian dressing adds freshness and vegetables to balance the rich, heavy bombs. The acidity in the dressing cuts through the butter and cheese.
Caesar Salad: Classic Caesar with romaine, Parmesan, and creamy dressing creates a more substantial side that still feels cohesive with the Italian-inspired bombs. The crisp lettuce provides textural contrast.
Roasted Vegetables: Simple roasted zucchini, bell peppers, or broccoli add color and nutrition without competing with the bombs. Toss them with olive oil, salt, and Italian seasoning for flavor harmony.
Garlic Bread: Not redundant—more garlic and more bread is the entire vibe of this meal. Serve warm garlic breadsticks alongside for people who want even more carbs with their cheese.
Pro Tips & Variations
Work quickly once you’ve opened the biscuit dough. The dough warms up and becomes sticky at room temperature, making it harder to handle and seal. If your kitchen is warm, split and fill the bombs as fast as possible, or refrigerate any dough you’re not actively using.
Don’t skip the greasing step on your baking sheet. Even non-stick pans benefit from a light coating of cooking spray, which prevents the bottoms from sticking and makes cleanup easier. The butter glaze also helps the bombs release more easily.
Flatten the dough evenly so the thickness is consistent throughout each circle. Uneven thickness means some parts cook faster than others, potentially leaving doughy spots or creating weak points in the seal where cheese can escape.
Sausage Variation: Replace pepperoni with cooked and crumbled Italian sausage. Brown the sausage in a skillet first, drain excess fat, and let it cool before using. A small spoonful per bomb provides savory, fennel-spiced flavor.
Vegetarian Version: Use sautéed mushrooms, diced bell peppers, or chopped olives instead of pepperoni. Make sure vegetables are cooked and well-drained before using to prevent excess moisture.
Cheese Variations: String cheese cut into half-inch segments works well and is easier than cubing mozzarella. Provolone or cheddar can replace mozzarella for different flavor profiles. A mix of mozzarella and Parmesan inside creates more complex cheese flavor.
Air Fryer Method: Arrange the bombs in a single layer in the air fryer basket and cook at 350°F for ten to twelve minutes until golden brown. Brush with garlic butter immediately after cooking. This method creates an even crispier exterior.
Storage & Reheating Tips
Pizza bombs are genuinely best eaten fresh while the cheese is still melty and the outside is crispy. The texture changes as they cool, with the exterior softening and the cheese firming up.
Store leftover bombs in an airtight container in the refrigerator for up to three days. The garlic butter soaks into the dough during storage, which isn’t necessarily bad—just different from fresh.
The air fryer is the superior reheating method by far. Place cold bombs in the air fryer basket and heat at 350°F for three to four minutes until hot throughout and the exterior crisps back up. This method comes closest to recreating the fresh-from-the-oven texture.
The oven works well for reheating multiple bombs. Place them on a baking sheet and heat at 350°F for about eight minutes until warmed through. The microwave makes them soggy and should be avoided—the steam from reheating turns the crispy exterior soft and rubbery.
Freezing works surprisingly well with these. Freeze baked and cooled bombs in a single layer on a baking sheet, then transfer to a freezer bag once solid. Reheat from frozen in the oven at 350°F for about twelve minutes or in the air fryer for six minutes.
Common Questions
Why did my cheese leak out? The seams weren’t sealed tightly enough, or there was too much filling. Make sure to pinch all the edges together very firmly and check for any gaps before baking. Placing the seam side down also helps keep everything contained.
Can I make these ahead and bake later? Assemble the bombs completely, place them on a baking sheet, cover with plastic wrap, and refrigerate for up to four hours before baking. Add two to three minutes to the baking time since they start cold.
What if my biscuits won’t split into layers? Some biscuit brands don’t have distinct layers. You can still make this recipe—just flatten each whole biscuit into a larger, thinner circle and use one biscuit per bomb instead of splitting them. You’ll get eight larger bombs instead of sixteen smaller ones.
Can I use homemade pizza dough instead of biscuits? Yes, though it changes the texture and cook time. Roll pizza dough into small circles, fill and seal as directed, and bake at 400°F for about eighteen to twenty minutes. The result will be more like calzones than the fluffy biscuit bombs.
What’s the best way to prevent the bottoms from getting too dark? Use parchment paper on your baking sheet for more even heat distribution. If the bottoms are browning too quickly, move the baking sheet to a higher oven rack so the bombs are farther from the bottom heating element.
These easy pepperoni pizza bombs prove that shortcuts can deliver genuinely delicious results. The combination of tender biscuit dough, molten cheese, savory pepperoni, and that final garlic butter glaze creates something that’s way more exciting than the sum of its simple parts—the kind of recipe that becomes a regular request from everyone at the ta
Easy Pepperoni Pizza Bombs
Ingredients
Equipment
Method
- Preheat oven to 375°F (190°C). Lightly grease a large baking sheet or cast iron skillet with cooking spray.
- Open biscuit tube and separate biscuits. Pull each biscuit apart horizontally into two layers to create 16 pieces total. Flatten each piece with your hands into a circle about 3-4 inches in diameter and 1/8-inch thick.
- In the center of each dough circle, place 1 teaspoon pizza sauce, 3-4 pieces of pepperoni, and 1 cube of mozzarella cheese.
- Bring the edges of the dough up and over the filling, gathering at the top. Pinch all seams together firmly, then gently roll between palms to seal and create a smooth sphere. Ensure no gaps or holes remain.
- Place sealed bombs seam-side down on prepared baking sheet, spacing about 1 inch apart.
- Bake 15 to 20 minutes until tops are deep golden brown and dough is cooked through.
- While bombs bake, whisk together melted butter, garlic powder, Italian seasoning, and grated Parmesan in a small bowl.
- Immediately after removing from oven, brush warm bombs generously with garlic butter glaze. Sprinkle with fresh parsley if using.
- Let cool 3 minutes before serving. Serve warm with marinara or ranch for dipping.