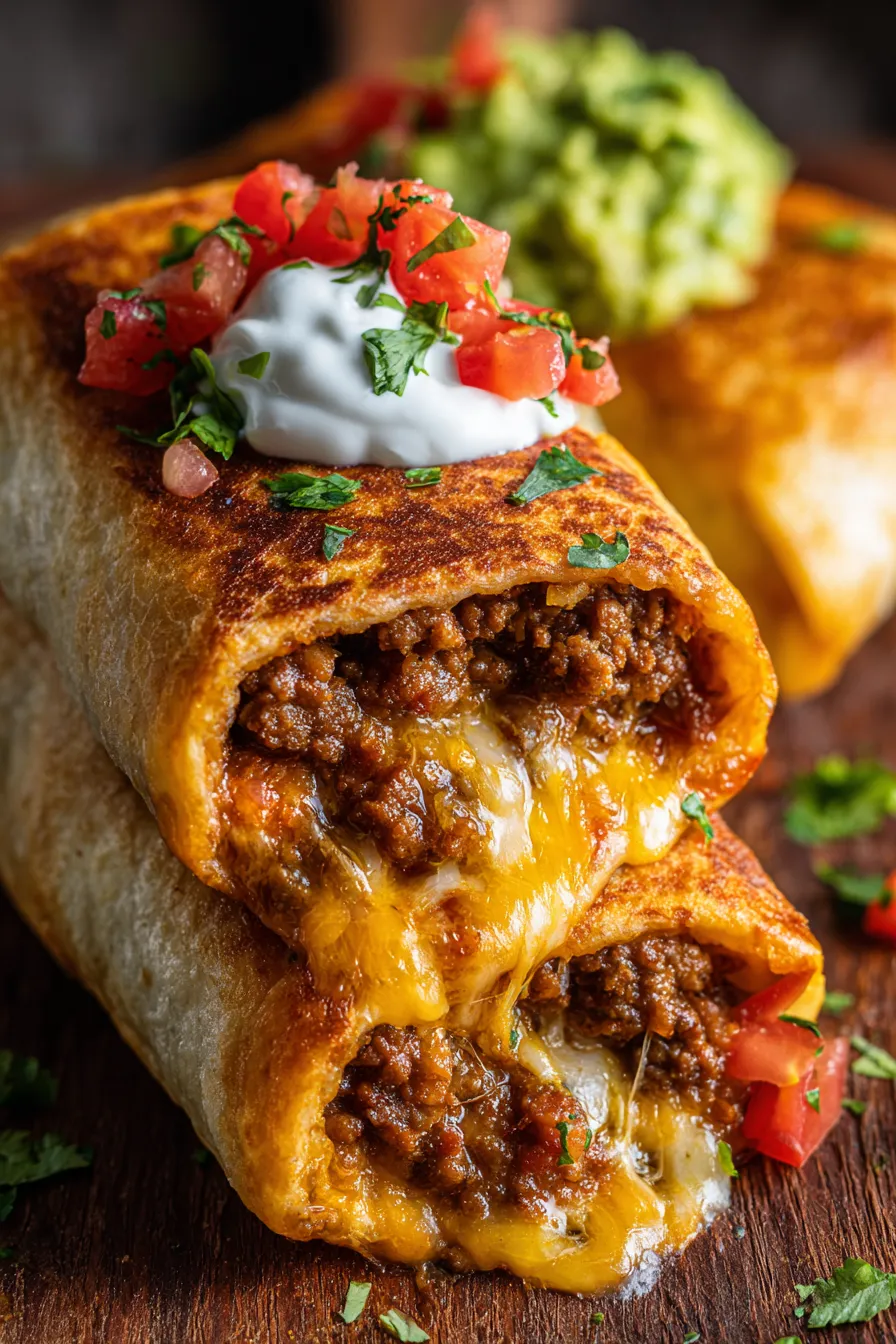
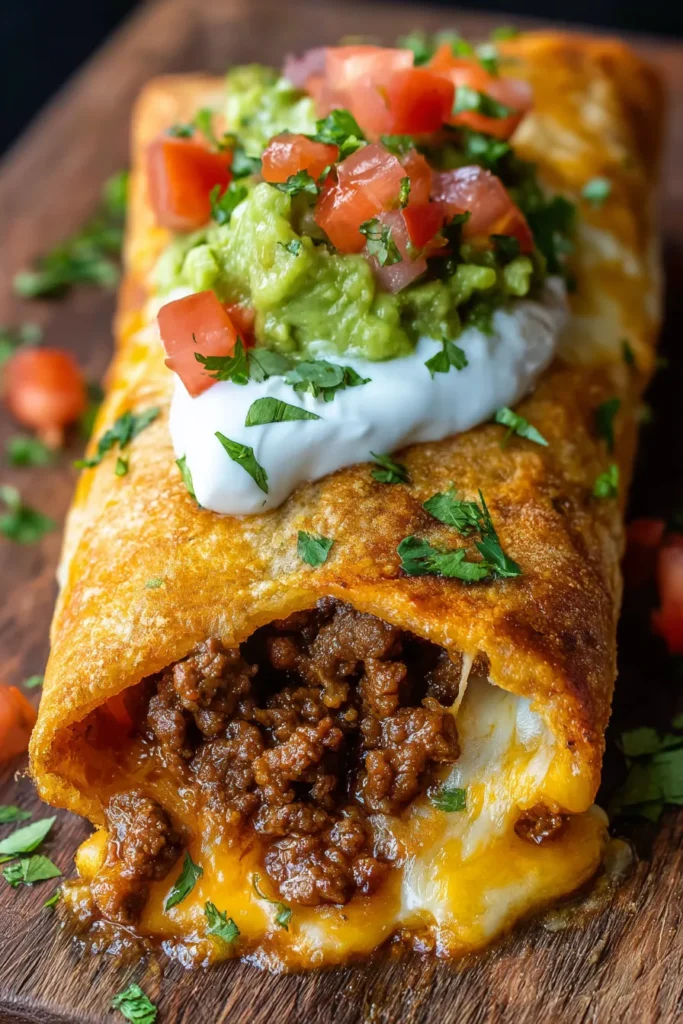
Chimichangas have a reputation for being a restaurant-only thing, something too messy or too involved for a Tuesday night at home. This recipe proves otherwise. Crispy beef and cheese chimichangas with a seasoned ground beef and refried bean filling come together in 40 minutes, crisp up beautifully in a skillet or the oven, and produce something that genuinely competes with any Tex-Mex restaurant version.
The filling is what makes these work so well. Ground beef seasoned with taco spices, salsa simmered in until the liquid reduces, and a layer of refried beans spread directly on the tortilla keeps every chimichanga moist in the center while the exterior crisps to a satisfying golden crunch. That combination of textures, crispy shell against creamy filling, is exactly what makes this dish worth making at home.
Both cooking methods work. The skillet version gives the deepest, most even golden color. The oven version is lower effort and handles a full batch simultaneously. Either way, the result is the same satisfying crunch.
Why You’ll Love This Crispy Beef and Cheese Chimichangas
The refried beans are a detail that makes a real difference in the finished filling. They act as a moisture barrier between the tortilla and the beef, keep the interior creamy and cohesive, and add a savory, earthy base layer that makes the filling taste more complex than seasoned ground beef alone. Every great chimichanga has this layer, and it’s often the ingredient that home cooks skip.
Salsa simmered into the beef is the other key detail. It adds acidity, moisture, and layers of tomato and chili flavor that dry taco seasoning alone doesn’t produce. Letting it reduce fully before assembly means the filling is flavorful and cohesive without being wet enough to make the tortilla soggy from the inside.
This is also a genuinely practical make-ahead dinner. Assembled chimichangas wrap and freeze for up to three months, making them one of the better options for a freezer meal that reheats into something crispy rather than soft and steamed.
Ingredients for Crispy Beef and Cheese Chimichangas
I always choose burrito-size flour tortillas for this recipe rather than the fajita or standard size. The larger diameter gives you enough room to fit a generous amount of filling while still having sufficient tortilla to fold the sides in before rolling. A tortilla that’s too small produces thin, uneven wraps that either don’t seal properly or have so little filling that the ratio is off.
The Filling:
- 1 lb ground beef
- 1 small onion, finely diced
- 2 cloves garlic, minced
- 1 packet (1 oz) taco seasoning
- 1/2 cup salsa
- 1 cup refried beans
The Assembly:
- 6 large flour tortillas (burrito-size)
- 1 1/2 cups shredded cheddar or Mexican blend cheese
- Vegetable oil (for frying or brushing)
Optional Toppings:
- Sour cream, guacamole, shredded lettuce, and extra salsa
For the cheese, shred it yourself from a block rather than using a pre-shredded bag. Freshly shredded cheese melts into the hot filling more smoothly during cooking and produces a gooier, more connected interior. A Mexican blend of cheddar, Monterey Jack, and Asadero is the most flavorful option. Straight cheddar is a reliable alternative with a sharper flavor. For the salsa, choose a variety that isn’t too watery. A thick, chunky salsa simmers into the beef without thinning the filling, while a thin salsa can make the mixture too loose to roll cleanly.
How to Make Crispy Beef and Cheese Chimichangas
The key to a properly sealed chimichanga is the seam-down placement, whether you’re using a skillet or the oven. The weight of the filling holds the folded edges against the heat source, which seals them shut during the first minute of cooking. If you place them seam-side up, the tortilla unrolls and the filling spills. Seam-side down is non-negotiable for both methods.
- In a large skillet over medium heat, cook the ground beef and diced onion together, breaking the beef into small crumbles, until the meat is fully browned and the onion is tender. Drain any excess grease thoroughly.
- Stir in the minced garlic, taco seasoning, and salsa. Simmer for 3 to 4 minutes, stirring occasionally, until the liquid has reduced and the filling holds together rather than pooling on the spoon. The filling should look cohesive, not wet.
- If the tortillas are stiff or cold, wrap them in a damp paper towel and microwave for 20 seconds. Pliable tortillas fold without cracking and seal more cleanly.
- Spread a generous spoonful of refried beans down the center of each tortilla, leaving about two inches of space at the top and bottom. Top with a scoop of the beef mixture and a handful of shredded cheese.
- Fold the left and right sides of the tortilla inward over the filling. Then roll the bottom up and over tightly, tucking the folded sides in as you roll, until you have a sealed package. Press gently to compact.
- Skillet method: Heat 2 to 3 tablespoons of vegetable oil in a skillet over medium heat. Place the chimichangas seam-side down and cook for 2 to 3 minutes per side until deep golden brown and crisp on all surfaces. Work in batches so the pan doesn’t cool down. Oven method: Preheat the oven to 400°F (200°C). Place chimichangas seam-side down on a baking sheet. Brush the tops and sides lightly with oil or melted butter. Bake for 18 to 20 minutes, flipping once halfway through, until golden and crisp.
- Let the chimichangas rest for 2 minutes before serving. The filling settles and the cheese firms slightly, which keeps everything inside when you cut or bite into them.
Pro tip: For the skillet method, use tongs to carefully hold each chimichanga on its side for 30 seconds to crisp the seam edge before laying it flat. This ensures every surface, including the sides, gets the same golden crust.
What to Serve with Crispy Beef and Cheese Chimichangas
The bold, Tex-Mex flavors here call for sides that complement the theme while providing contrast in temperature or freshness.
Spanish rice: The classic pairing for chimichangas and the most complete restaurant-style plate you can build around this recipe. Tomato-seasoned rice with cumin alongside a crispy chimichanga is the combination most people are thinking of when they order this dish out.
Pico de gallo: Fresh tomato, onion, cilantro, and lime pico is the best fresh topping option for chimichangas. It adds acidity and brightness that cuts through the richness of the beef and cheese filling.
Guacamole: Cool, creamy guacamole spooned over or alongside the chimichanga is a natural match for the Tex-Mex flavor profile and provides a fatty richness that complements the crispy shell.
Shredded lettuce and sour cream: The simplest garnish combination and one that works consistently. The cold crunch of iceberg alongside the warm chimichanga and a generous spoonful of sour cream is classic for a reason.
Smothered version: Ladle warm queso dip or enchilada sauce directly over the finished chimichangas before adding toppings. This transforms the dish from crispy to saucy and indulgent in the most satisfying way.
Black beans: A simple side of seasoned black beans with cumin and a squeeze of lime adds fiber and protein alongside the chimichanga and rounds out the plate into something genuinely filling.
Pro Tips & Variations
Smothered chimichangas: After baking or frying, transfer the chimichangas to a baking dish, cover completely with enchilada sauce or warm queso, and top with shredded cheese. Broil for 2 to 3 minutes until the cheese melts. The crispy exterior softens under the sauce but the filling stays intact and the result is deeply satisfying.
Chicken version: Shredded rotisserie chicken tossed with taco seasoning and salsa works as a direct substitute for the ground beef. Use the same assembly and cooking method. The chicken version is slightly lighter and takes even less time since there’s no meat to brown.
Leftover roast beef: Finely chopped or shredded leftover roast beef produces a more complex, savory filling than ground beef. Season it the same way and simmer with salsa until heated through and cohesive.
Freeze ahead: Assemble the chimichangas without cooking, wrap individually in foil, and freeze for up to 3 months. Bake from frozen at 350°F for 25 to 30 minutes until heated through and crispy. This is one of the better freezer meal options in terms of quality after reheating.
Add heat: Diced pickled jalapeños stirred into the beef filling or a few shakes of hot sauce mixed into the salsa adds heat directly into the chimichanga rather than just on top of it.
Storage & Reheating Tips
Cooked chimichangas keep in an airtight container in the refrigerator for up to 3 days. I find the oven or air fryer brings back the crispiness far better than the microwave for reheating. A 375°F oven for 10 to 12 minutes or an air fryer at 375°F for 4 to 5 minutes restores a good amount of the exterior crunch. The microwave heats them faster but produces a softer shell throughout. For freezing cooked chimichangas, wrap individually in foil and freeze for up to 2 months. Reheat from frozen at 350°F for 20 to 25 minutes, unwrapping the foil for the final 5 minutes to re-crisp the exterior.
Common Questions
My chimichanga unrolled in the pan. What went wrong? Almost always a seam placement issue. The first thing that goes into the oil or onto the baking sheet should be the seam side. If the chimichanga still opens, it usually means either the filling was overfilled, the seam wasn’t tight enough when rolling, or the tortilla was too cold and stiff to fold cleanly. Warm the tortillas and roll more tightly, keeping the sides folded firmly in as you complete the roll.
Can I air fry these instead of using the skillet or oven? Yes. Air fry at 400°F for 8 to 10 minutes, flipping halfway through and brushing both sides lightly with oil before cooking. The air fryer produces a very even, all-around crisp that’s comparable to the skillet method with less oil. It’s the best option if you want a single batch done quickly with minimal cleanup.
My filling is too wet and the tortilla is getting soggy. How do I fix it? Continue simmering the filling after adding the salsa until most of the visible liquid has evaporated. The mixture should hold its shape on a spoon without releasing liquid. If it’s still too wet, spread the filling on a plate to cool slightly and allow the steam to escape before assembling. A wet filling is the most common cause of soft, uneven chimichangas.
Crispy beef and cheese chimichangas belong in the regular weeknight dinner rotation for any household that enjoys Tex-Mex cooking. The filling is bold and satisfying, the crunch is genuine, and the whole thing comes together faster than most people expect. Make a full batch, freeze half for later, and have one of the better weeknight dinners in your back pocket whenever you need it.

Crispy Beef and Cheese Chimichangas
Ingredients
Equipment
Method
- In a large skillet over medium heat, cook the ground beef and diced onion until the meat is fully browned and the onion is tender. Drain any excess grease.
- Stir in the minced garlic, taco seasoning, and salsa. Simmer for 3 to 4 minutes, stirring occasionally, until the liquid has reduced and the filling is cohesive rather than wet.
- If the tortillas are stiff, wrap in a damp paper towel and microwave for 20 seconds until pliable.
- Spread a spoonful of refried beans down the center of each tortilla. Top with a scoop of the beef mixture and a handful of shredded cheese. Fold in the sides, then roll up tightly from the bottom, keeping the sides tucked in.
- Skillet method: Heat 2 to 3 tablespoons of vegetable oil over medium heat. Place chimichangas seam-side down and cook 2 to 3 minutes per side until deep golden and crisp on all surfaces. Oven method: Preheat oven to 400°F. Place seam-side down on a baking sheet, brush with oil or butter, and bake for 18 to 20 minutes, flipping halfway through.
- Let the chimichangas rest for 2 minutes before serving. Top with sour cream, guacamole, shredded lettuce, and pico de gallo as desired.