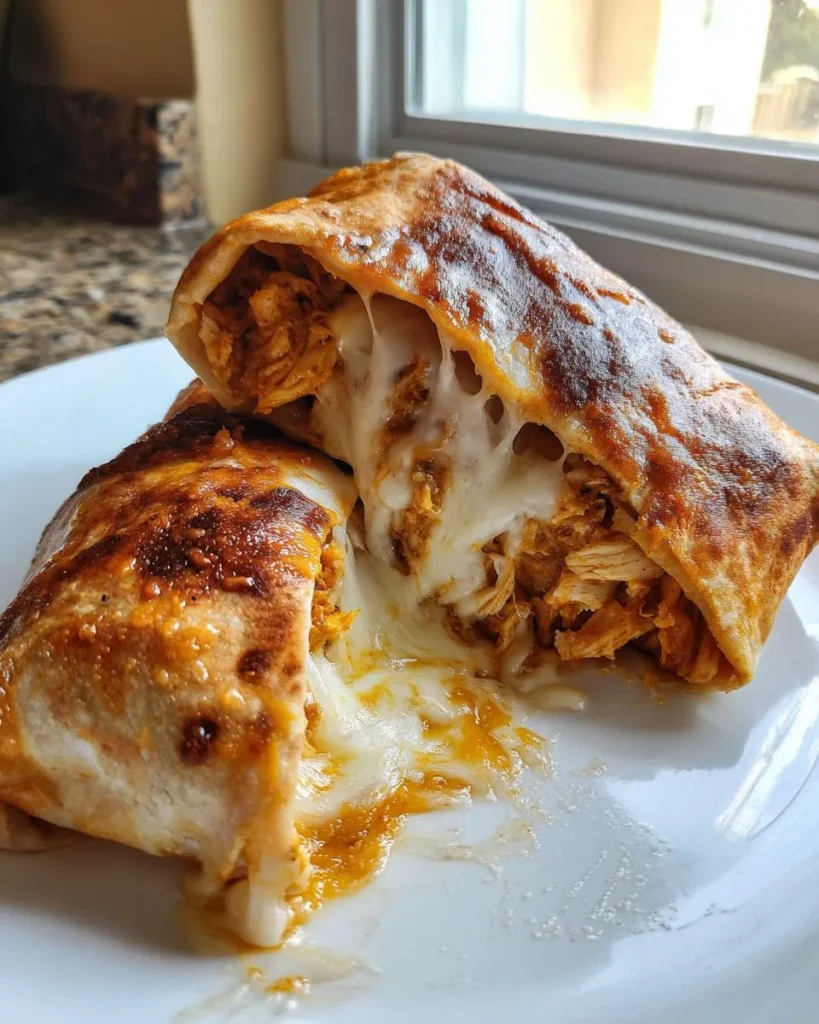
Crispy baked chicken chimichangas hit that sweet spot between effort and reward on a weeknight. You get that golden, crackling tortilla shell without heating up a pot of oil, and the filling comes together in about five minutes using rotisserie chicken. This is the kind of dinner that feels a little more special than a typical weeknight meal without actually requiring much from you.
The cream cheese in the filling is what makes this recipe worth coming back to. It pulls everything together into a cohesive, creamy mixture that stays moist inside the tortilla during baking. Paired with salsa and a generous layer of melted cheese, the inside is rich and flavorful while the outside gets legitimately crispy from a brush of butter and a hot oven.
Why You’ll Love This Crispy Baked Chicken & Cheese Chimichangas
Rotisserie chicken makes this recipe genuinely fast. There’s no cooking protein from scratch, which means the filling is ready in minutes and you’re sliding the pan into the oven before you know it.
The butter brushed over each chimichanga before baking is the detail that separates this from a sad, pale baked burrito. It browns and crisps the tortilla in a way that gets surprisingly close to the deep-fried version, and the high oven temperature seals the deal.
These reheat beautifully, which makes them a reliable meal prep option. Pull a couple from the fridge mid-week, run them through the air fryer for a few minutes, and dinner is done. The filling also adapts easily, so you can build on the base recipe with whatever you have on hand.
Ingredients for Crispy Baked Chicken & Cheese Chimichangas
I always keep a rotisserie chicken on hand for recipes like this. It’s already seasoned, already cooked, and shreds in minutes. Three cups comes out to roughly one standard rotisserie chicken, so there’s no measuring guesswork involved.
The Filling:
- 3 cups cooked chicken, shredded (rotisserie works perfectly)
- 1 cup salsa, your preferred heat level
- 1 teaspoon ground cumin
- 1/2 teaspoon garlic powder
- 1/2 teaspoon chili powder
- 4 oz cream cheese, softened
- 2 cups shredded Mexican blend or Monterey Jack cheese
The Base:
- 6 to 8 large flour tortillas, burrito size
- 2 tablespoons butter, melted (or olive oil spray)
Optional Toppings:
- Sour cream, guacamole, shredded lettuce, or diced tomatoes
For the salsa, I go with medium heat since the spice level mellows out during baking. If you want more heat in the finished chimichanga, bump up to hot or add a pinch of cayenne directly to the filling. Monterey Jack is my go-to cheese here because it melts smoothly and has a mild, creamy flavor that doesn’t overpower the chicken. Mexican blend is a great substitute and adds a little more sharpness from the cheddar component.
How to Make Crispy Baked Chicken & Cheese Chimichangas
The key to getting a truly crispy shell from the oven is two things: high heat and fat on the outside of the tortilla. I find that melted butter gives you slightly better browning than olive oil spray, though both work well.
- Preheat the oven. Set your oven to 400°F (200°C) and line a large baking sheet with parchment paper. Getting the oven fully preheated before the chimichangas go in is important for that initial burst of heat that starts the crisping process.
- Mix the filling. In a large bowl, combine the shredded chicken, salsa, cumin, garlic powder, and chili powder. Stir to distribute the seasoning evenly, then add the softened cream cheese in chunks. Mix until the filling is creamy and everything is well incorporated. The mixture should hold together without being wet or runny.
- Assemble. Lay a large flour tortilla flat on your work surface. Spoon about 1/2 cup of the chicken filling into the center and spread it slightly, then top with a generous handful of shredded cheese. Keep the filling away from the edges so you have enough tortilla to fold and seal.
- Fold. Fold in the two sides of the tortilla toward the center, then roll it up tightly from the bottom, tucking the sides as you go like a burrito. Place seam-side down on the prepared baking sheet. Repeat with the remaining tortillas.
- Brush with butter. Brush the top and exposed sides of each chimichanga with melted butter. Don’t be shy here. This is what creates the golden color and crispy texture in the oven.
- Bake. Bake for 18 to 20 minutes until the tortillas are deep golden brown and visibly crisp. Flip halfway through if you want even browning on both sides, though the seam-side develops a nice crust on its own from the pan contact.
- Rest before serving. Let them sit for 5 minutes before cutting or plating. The filling settles and the shell firms up slightly during that rest.
Pro tip: Place the chimichangas seam-side down immediately after rolling. The heat welds the tortilla shut during the first few minutes of baking, so they stay sealed without toothpicks.
What to Serve with Crispy Baked Chicken & Cheese Chimichangas
A good side rounds out the plate and balances the richness of the chimichanga filling.
Cilantro Lime Rice: The bright, citrusy flavor works well alongside the creamy, spiced filling. It’s also filling enough to stretch the recipe further if you’re feeding a crowd.
Black Bean and Corn Salad: A cool, fresh side with lime dressing contrasts nicely with the hot, crispy chimichangas. The beans also add extra protein to the meal.
Shredded Cabbage Slaw: Simple slaw with lime juice and a pinch of salt gives you crunch and freshness without much effort. It also doubles as a topping if you slice the chimichanga open.
Roasted Sweet Potatoes: The natural sweetness plays well against the savory, spiced chicken filling. Cube them small and roast alongside the chimichangas for an easy one-oven dinner.
Tomato and Avocado Salad: Ripe tomatoes, sliced avocado, red onion, and lime juice come together in minutes and add brightness to the plate without any cooking required.
Pro Tips & Variations
Soften the cream cheese first. Cold cream cheese won’t incorporate smoothly into the filling. Let it sit at room temperature for 20 minutes or microwave it for 15 seconds before mixing.
Don’t overfill. About 1/2 cup of filling per tortilla is the right amount. Too much and the tortilla won’t seal properly, leading to filling leaking out during baking.
Greek yogurt swap: Replace the cream cheese with plain Greek yogurt for a tangier filling with a higher protein content. Use full-fat Greek yogurt for the closest texture match.
Add mix-ins: Diced green chiles, black beans, or corn stirred directly into the filling add texture and bulk without changing the overall method.
Make it spicier: Stir in a teaspoon of chipotle in adobo or use pepper jack cheese in place of Monterey Jack for a smokier, spicier result.
Gluten-free option: Large gluten-free flour tortillas work here. Warm them slightly before filling to prevent cracking when you fold.
Storage & Reheating Tips
Store cooled chimichangas in an airtight container in the refrigerator for up to 4 days. I find they hold up better than most baked tortilla dishes because the filling is cohesive enough that nothing leaks during storage.
For reheating, the air fryer at 350°F for 5 to 6 minutes brings back most of the original crunch. The oven works too at the same temperature, though it takes closer to 8 to 10 minutes. Skip the microwave if possible since it makes the tortilla soft rather than crispy.
To meal prep ahead, assemble the chimichangas fully, brush with butter, and refrigerate unbaked for up to 24 hours. Bake directly from the fridge, adding 3 to 4 minutes to the total cook time.
Common Questions
Can I use canned chicken instead of rotisserie? You can, though rotisserie chicken gives a much better texture and flavor. If using canned, drain it thoroughly and pat it dry before mixing with the other filling ingredients to prevent a watery result.
My chimichangas aren’t getting crispy. What went wrong? The two most common causes are not enough fat on the outside of the tortilla or an oven that wasn’t fully preheated. Make sure you brush every exposed surface with butter and give the oven a full 10 to 15 minutes to reach temperature before baking.
Can I make these in the air fryer instead of the oven? Yes. Cook at 375°F for 10 to 12 minutes, flipping halfway through. The air fryer tends to produce slightly crispier results than the oven, so keep an eye on them toward the end to avoid over-browning.
These crispy baked chicken chimichangas are reliable, crowd-friendly, and genuinely satisfying. Once you have the filling method down, you can riff on it endlessly based on what’s in the fridge. Give them a spot in your weeknight rotation and see how quickly they become a household staple.

Crispy Baked Chicken & Cheese Chimichangas
Ingredients
Equipment
Method
- Preheat oven to 400°F (200°C). Line a large baking sheet with parchment paper or lightly grease it.
- In a large bowl, combine the shredded chicken, salsa, cumin, garlic powder, and chili powder. Add the softened cream cheese in chunks and stir until the mixture is smooth, creamy, and well combined.
- Lay a large flour tortilla flat. Spoon about 1/2 cup of filling into the center and top with a generous handful of shredded cheese.
- Fold in the two sides of the tortilla toward the center, then roll it up tightly from the bottom like a burrito. Place seam-side down on the prepared baking sheet. Repeat with remaining tortillas.
- Brush the top and sides of each chimichanga generously with melted butter or spray thoroughly with olive oil.
- Bake for 18 to 20 minutes, flipping halfway through if desired, until the tortillas are deep golden brown and crispy.
- Let chimichangas rest for 5 minutes before serving. Top with sour cream, guacamole, shredded lettuce, or extra salsa as desired.