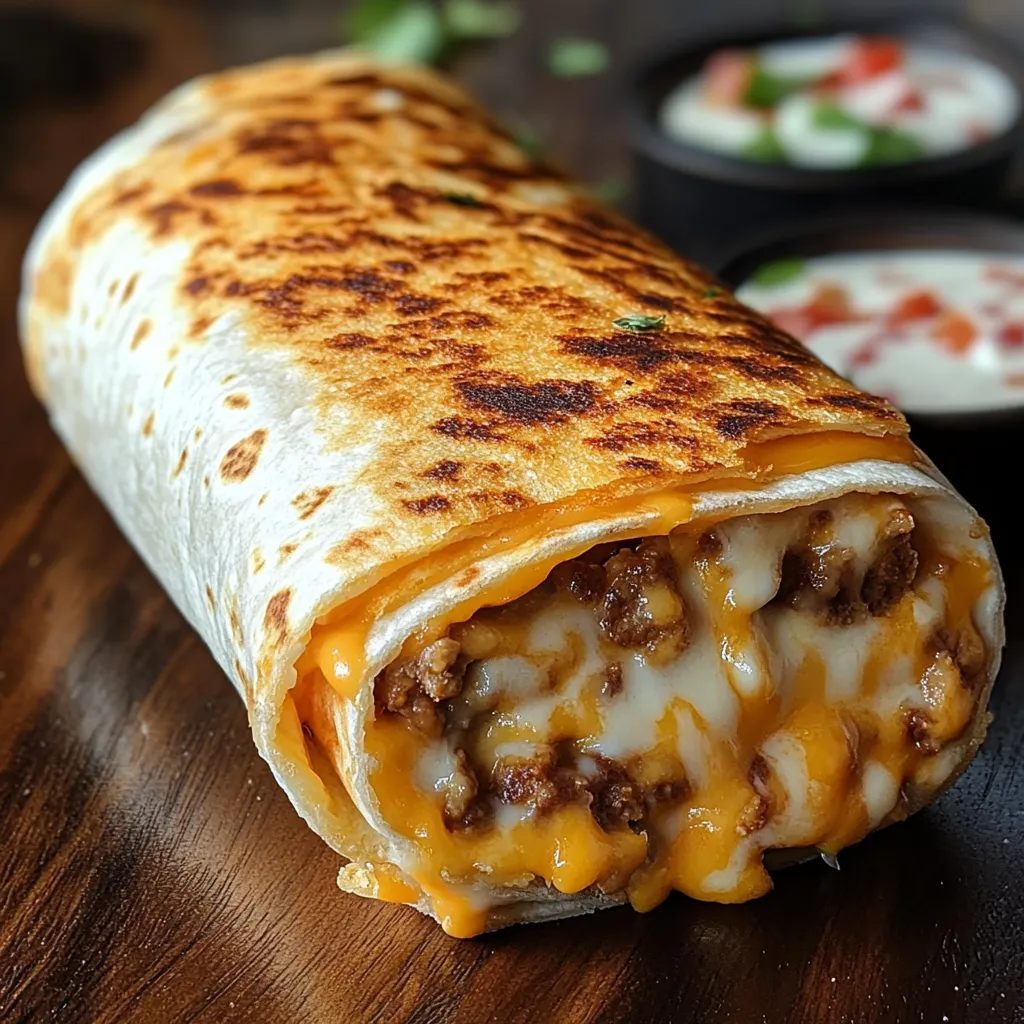
When you’re craving fast food but want to control the ingredients and boost the protein, high protein grilled cheese burrito delivers that iconic Taco Bell experience right in your own kitchen. This copycat recipe recreates the viral menu item that took social media by storm with its crispy cheese crust wrapped around a loaded burrito filled with seasoned beef, rice, and all the fixings. The genius is in that final step where you fry the burrito directly on top of melting cheese, creating an irresistible golden crust that elevates an ordinary burrito into something extraordinary.
I make this when I want the satisfaction of indulgent comfort food without the drive-thru wait or the mystery ingredients. The homemade version lets you use quality beef, control the sodium, and pack in extra protein while still capturing that addictive combination of textures—the crispy cheese shell, the crunchy tortilla strips, the creamy nacho cheese, and the savory seasoned beef. It’s the kind of meal that feels like a treat but actually delivers solid nutrition.
Why You’ll Love This Grilled Cheese Burrito
This recipe captures the essence of what makes the original so popular while giving you complete control over the ingredients and portions. The crispy cheese crust is surprisingly easy to achieve at home and creates that wow factor that makes this more than just another burrito. The contrast between the crunchy exterior and the warm, creamy interior is what makes each bite compelling.
The protein content is substantial, with lean ground beef providing the foundation and cheese throughout adding even more. Each burrito delivers around 40 grams of protein, making this genuinely satisfying and appropriate for anyone focused on high-protein eating. The combination of protein and carbs from the rice creates balanced energy that keeps you full.
Customization is built into the concept. Adjust the spice level with jalapeños, swap proteins based on preference or what’s on sale, control the cheese ratio, or add extra vegetables. The basic technique stays the same regardless of your filling choices, so you can make this recipe work for various dietary needs and taste preferences.
The fun factor makes this appealing for family dinners or casual gatherings. The crispy cheese crust impresses people and creates a restaurant-quality presentation that makes the meal feel special. Kids and adults alike get excited about the novelty of cheese welded to the outside of a burrito.
Ingredients for Grilled Cheese Burrito
I choose ingredients carefully since each layer contributes to the overall experience. Quality matters particularly for the beef and cheese, which form the foundation of both flavor and texture.
Main Components:
- 1 lb lean ground beef
- 1 packet taco seasoning
- 2 cups cooked rice, seasoned with cilantro and lime
- 1/2 cup nacho cheese sauce
- 1/4 cup sour cream
- 1/2 cup red strips (or crushed tortilla chips)
- 1/2 cup shredded three-cheese blend (inside filling)
- 1 cup shredded cheddar or Mexican blend (outside crust)
- 1/2 cup pickled jalapeños (optional)
- 4 large flour tortillas (burrito size)
Lean ground beef at 90% lean or higher provides plenty of protein while minimizing excess grease that would make the burrito soggy. I brown it thoroughly and drain well to prevent a greasy final product. Ground turkey or chicken works as a lighter alternative, though beef provides the most authentic flavor.
Taco seasoning can be a store-bought packet or homemade blend. The packet is convenient and delivers consistent flavor that mimics the fast-food original. If making your own, combine chili powder, cumin, paprika, garlic powder, onion powder, and a touch of salt.
Seasoned rice adds substance and helps absorb some of the liquid from the other ingredients. I use white rice tossed with fresh cilantro and lime juice while still warm. The cilantro-lime combination is classic Chipotle/Taco Bell style and adds brightness. Cook the rice ahead to save time during assembly.
Nacho cheese sauce is essential for authenticity. You can use jarred queso or make a quick stovetop version with real cheese and milk. The processed nacho cheese sauce from the grocery store actually works well here and provides that distinctive flavor. Warm it slightly before using so it spreads easily.
Sour cream adds cool creaminess that balances the seasoned beef and spicy jalapeños. Full-fat sour cream has the best texture, though Greek yogurt substitutes well if you want extra protein and tangier flavor.
Red strips are the crunchy tortilla strips found in bags near the salad toppings. They add essential textural contrast that makes each bite interesting. If you can’t find them, crush regular tortilla chips into strips—the crunch is what matters.
The cheese appears twice in this recipe with different purposes. The inside cheese (three-cheese blend or Mexican blend) melts into the filling. The outside cheese (shredded cheddar or Mexican blend) creates the signature crispy crust. I use sharp cheddar for the outside because it browns beautifully and has bold flavor.
Burrito-size flour tortillas need to be fresh and pliable for easy rolling. Stale tortillas crack when you fold them. The large 10-12 inch tortillas give you enough surface area to hold all the fillings without overstuffing.
How to Make Grilled Cheese Burrito
The technique requires attention to layering and timing, but nothing about it is particularly difficult. Working methodically prevents messy burritos or burnt cheese.
Prepare the Seasoned Beef: Heat a large skillet over medium-high heat. Add the ground beef and cook, breaking it apart with a wooden spoon or spatula, until completely browned with no pink remaining, about 6-8 minutes. This should take longer than you think—really let it brown to develop flavor. Drain off excess fat by tilting the pan and spooning it out, or pour everything into a colander over a bowl. Return the beef to the pan and sprinkle the taco seasoning over it. Add about 1/4 cup of water and stir to distribute the seasoning. Simmer for 3-5 minutes until the water reduces and the beef looks glossy and well-coated. Remove from heat and set aside.
Prepare Your Assembly Station: Have all your components ready and within reach—this makes assembly faster and prevents ingredients from cooling. Warm your nacho cheese slightly if it’s thick, and make sure your rice is at room temperature or slightly warm. Lay out the tortillas on a clean work surface.
Layer the Fillings Strategically: Working with one tortilla at a time, visualize a horizontal line across the center. Spread about 1/2 cup of the seasoned rice in a line across that center, leaving about 2 inches of space on each side. Don’t spread rice all the way to the edges or it will squish out when you fold. Top the rice with about 1/3 cup of the seasoned beef, spreading it evenly over the rice. Drizzle about 2 tablespoons of warm nacho cheese over the beef—zigzag it back and forth for even distribution. Add a generous tablespoon of sour cream. Sprinkle about 2 tablespoons of red strips over everything. Add a small handful (about 2 tablespoons) of the inside cheese blend. If using jalapeños, add a few slices now.
Roll the Burrito Properly: This step is crucial for preventing spillage. Fold the left and right sides of the tortilla toward the center, overlapping the filling slightly. These side folds contain the ingredients. Then, starting from the bottom edge closest to you, fold it up and over the filling. Pull back slightly to tighten everything, then continue rolling away from you, keeping tension on the burrito to create a tight cylinder. The final edge should seal against the burrito. Place seam-side down and set aside. Repeat with remaining tortillas and filling.
Create the Cheese Crust: This is the signature step that makes this special. Heat a non-stick skillet over medium heat—temperature control matters here. Too hot and the cheese burns before the burrito warms; too cool and the cheese won’t crisp properly. Sprinkle a generous 1/4 cup of shredded cheddar in a circle roughly the size of your burrito directly onto the dry skillet. Don’t add oil or butter—the cheese creates its own fat. Watch as the cheese melts and begins to bubble. When the edges start to turn golden and the center is fully melted (about 1-2 minutes), it’s ready.
Fuse Burrito and Cheese: Carefully place one burrito seam-side up directly on top of the melting cheese. Press down gently but firmly with a spatula to help the cheese adhere to the tortilla. The heat and pressure fuse the crispy cheese to the burrito. Cook for 1-2 minutes until the cheese forms a golden, crispy crust that’s attached to the tortilla. You’ll hear it sizzle and crisp.
Flip and Finish: Using a spatula, carefully flip the burrito to expose the cheese-crusted side. If desired, add another 1/4 cup of shredded cheese to the pan and place the burrito on top of it to create a cheese crust on the other side. Otherwise, just cook the second side for about 1 minute to warm it through. The goal is heating the entire burrito while maintaining that crispy cheese exterior.
Serve Immediately: Transfer to a plate and serve right away while the cheese crust is still crispy and the inside is warm and melty. The textural contrast is best when fresh—waiting causes the crispy cheese to soften.
What to Serve with Grilled Cheese Burrito
This burrito is substantial on its own, but a few strategic sides round out the meal and add freshness to balance the richness.
Black Beans: Seasoned black beans with cumin provide extra protein and fiber while staying in theme with the Mexican-inspired flavors. Their creamy texture complements the crispy burrito.
Mexican Chopped Salad: Fresh lettuce, tomatoes, corn, and avocado with lime-cilantro dressing add crunch and brightness that cut through the rich, cheesy burrito. The cool salad balances the warm main dish.
Chips and Salsa: Simple tortilla chips with fresh pico de gallo or salsa verde keep things casual and fun. The bright acidity of salsa cleanses your palate between bites.
Mexican Street Corn: Grilled corn with mayo, cotija cheese, and chili powder adds sweet, smoky, tangy elements that enhance the overall meal. The charred corn provides textural contrast.
Refried Beans: Creamy refried beans create a classic Mexican plate presentation. Their smooth texture works well alongside the loaded burrito.
Fresh Guacamole: Creamy, rich guacamole adds healthy fats and fresh flavor. The avocado’s buttery texture and bright lime flavor balance the cheese-heavy burrito.
Pro Tips & Variations
Non-Stick Pan Essential: Use a high-quality non-stick skillet for the cheese crust step. Regular pans, even well-seasoned cast iron, tend to have the cheese stick to the pan instead of the burrito, creating frustrating cleanup and poor results.
Temperature Control: Medium heat is crucial for the cheese crust. Too high and the cheese burns before adhering; too low and it doesn’t crisp properly. Adjust your burner to find that sweet spot where the cheese melts, browns, and crisps in 1-2 minutes.
Don’t Overfill: Resist the temptation to cram extra filling into each burrito. Overstuffed burritos are impossible to roll tightly and burst during the cheese-crusting step. Moderate filling creates better structure.
Protein Swaps: Ground turkey, ground chicken, or shredded rotisserie chicken all work beautifully. For vegetarian versions, use seasoned black beans or refried beans as the protein base.
Boost Protein Further: Use Greek yogurt instead of sour cream to add extra protein. Mix additional cooked chicken or extra beef into the filling if you want seriously high protein content.
Rice Variations: Use cauliflower rice for a low-carb version. The texture is different but the concept still works. Brown rice adds fiber and nutrients if you prefer whole grains.
Spice It Up: Add chipotle peppers in adobo sauce to the beef while cooking, use pepper jack cheese instead of cheddar, or include fresh jalapeños in the filling for heat throughout.
Make Assembly Faster: Prep all components ahead—cook the beef and rice the day before, store in the refrigerator, and just assemble and grill when ready to eat.
Storage & Reheating Tips
These burritos are genuinely best fresh when the cheese crust is still crispy and the interior is warm and melty. However, leftovers can be stored and reheated with reasonable results if you use the right method.
Store assembled but un-grilled burritos wrapped tightly in foil in the refrigerator for up to 2 days. When ready to eat, add the cheese crust and grill as directed. This preserves the crispy texture better than storing already-grilled burritos.
If you have leftover grilled burritos, wrap them in foil and refrigerate for up to 2 days. The cheese crust will soften during storage, but you can restore some crispness during reheating.
Air fryer reheating produces the best results for already-grilled burritos. Preheat the air fryer to 350°F and cook for 5-7 minutes, flipping halfway through. The circulating air re-crisps the cheese crust surprisingly well.
Oven reheating works but takes longer. Preheat to 375°F, place the burrito on a baking sheet, and heat for 12-15 minutes until warmed through. For extra crispness, unwrap for the last 3 minutes.
Microwave reheating is fastest but creates the softest results. The cheese crust will not be crispy—it becomes chewy instead. If you must microwave, use 50% power and heat in 1-minute intervals to prevent the tortilla from becoming rubbery.
These don’t freeze particularly well because the multiple textures don’t survive freezing and thawing intact. The rice becomes mushy, the cheese crust loses its appeal, and the tortilla strips get soggy. Make only what you’ll eat within two days for the best experience.
This high protein grilled cheese burrito proves that you can recreate popular fast food at home with better ingredients and impressive results. The crispy cheese crust, loaded filling, and satisfying crunch make this a dinner that feels indulgent while delivering solid nutrition. Give this a try when you want that drive-thru satisfaction without leaving your kitchen.
Copycat Taco Bell Grilled Cheese Burrito
Ingredients
Equipment
Method
- In a large skillet over medium-high heat, brown ground beef until no pink remains, about 6-8 minutes. Drain excess fat. Stir in taco seasoning and 1/4 cup water. Simmer for 3-5 minutes until glossy and well-coated. Remove from heat.
- Lay one tortilla flat. Spread 1/2 cup rice in a horizontal line across the center, leaving 2 inches on each side. Top with 1/3 cup seasoned beef, 2 tablespoons nacho cheese sauce, 1 tablespoon sour cream, 2 tablespoons red strips, 2 tablespoons inside cheese blend, and jalapeños if using.
- Fold left and right sides of tortilla toward center over filling. Starting from the bottom edge, fold up and over filling, pull back to tighten, then roll away from you into a tight cylinder. Place seam-side down. Repeat with remaining tortillas.
- Heat a non-stick skillet over medium heat. Sprinkle 1/4 cup shredded cheddar in a circle the size of your burrito directly onto the dry pan.
- When cheese melts and edges turn golden (1-2 minutes), place one burrito seam-side up on top of melting cheese. Press gently with spatula to adhere cheese to tortilla.
- Cook for 1-2 minutes until cheese forms a crispy golden crust attached to the burrito. Flip and cook other side for 1 minute to warm through. Optional: add more cheese to pan and create crust on second side.
- Serve immediately while cheese crust is crispy and inside is warm and melty. Repeat with remaining burritos.