Gravy 101: The Science of Silky Smoothness
The magic of gravy lies in understanding a few key scientific principles: starch gelatinization, fat emulsification, and the Maillard reaction.- Starch Gelatinization: This is where the thickening power comes from. Starch granules, whether from flour or cornstarch, need heat and liquid to swell and trap water, creating a viscous sauce. Too little heat, and the starch remains grainy. Too much, and you risk scorching.
- Fat Emulsification: Gravy is essentially a fat-in-water emulsion. The fat (butter, chicken drippings) needs to be evenly dispersed throughout the water-based broth. A stable emulsion prevents the gravy from separating and becoming greasy. This is aided by the starch and the constant whisking action.
- Maillard Reaction: This is what contributes to the delicious, savory flavor and rich color of gravy. It’s the chemical reaction between amino acids and reducing sugars that occurs at high temperatures, creating hundreds of flavor compounds. Roasting the chicken and browning the garlic contribute significantly to this reaction.
The Ultimate Chicken and Garlic Gravy Recipe
 This recipe is your roadmap to gravy perfection. Follow it closely, and you’ll be amazed at the results.
Ingredients:
- 4 tablespoons unsalted butter
- 4 cloves garlic, minced
- 4 tablespoons all-purpose flour
- 4 cups chicken broth (low sodium preferred)
- 1 cup pan drippings from roasted chicken (if available, otherwise use more broth)
- 1/2 teaspoon dried thyme
- 1/4 teaspoon black pepper
- Salt to taste
- Optional: 1 tablespoon chopped fresh parsley, for garnish
Instructions:
- Prepare the Base: In a medium saucepan, melt the butter over medium heat. Add the minced garlic and cook for 1-2 minutes, until fragrant and lightly golden, being careful not to burn it.
- Make the Roux: Whisk in the flour and cook for 2-3 minutes, stirring constantly, to create a smooth roux. This step is crucial for developing flavor and preventing lumps.
- Add the Liquids: Gradually whisk in the chicken broth, a little at a time, ensuring each addition is fully incorporated before adding more. This prevents lumps from forming.
- Incorporate the Drippings: Stir in the pan drippings from the roasted chicken (if using). This adds a ton of flavor and richness. If you don’t have drippings, simply use more chicken broth.
- Season and Simmer: Add the dried thyme and black pepper. Bring the gravy to a simmer, then reduce the heat to low and cook for 10-15 minutes, or until the gravy has thickened to your desired consistency. Stir occasionally to prevent sticking.
- Adjust and Serve: Taste the gravy and adjust the seasoning with salt as needed. If the gravy is too thick, add a little more chicken broth to thin it out. If it’s too thin, continue simmering until it reaches the desired consistency. Garnish with chopped fresh parsley (optional) before serving.
My Chicken and Garlic Gravy Investigation: A Culinary Odyssey
My journey to gravy mastery was not a straight line. It was filled with lumpy disasters, flavorless disappointments, and moments of sheer panic. But through meticulous experimentation and a relentless pursuit of perfection, I finally cracked the code.The Early Years: Lumpy Gravy Land
My first few attempts were a disaster. I’d dump all the flour in at once, creating a cement-like paste that no amount of whisking could save. The gravy would be lumpy, bland, and utterly unappetizing. I even tried using a blender once to smooth out the lumps – a move I deeply regret. The results were, let’s just say, explosive.The Roux Revelation: An “Aha!” Moment
Then, I had an “Aha!” moment. I realized the importance of the roux – that humble mixture of fat and flour. I learned that cooking the roux properly, allowing it to develop a nutty aroma and light golden color, was crucial for both flavor and thickening power. I started using clarified butter for an even richer flavor and higher smoke point.Broth Blunders: Sodium Overload
Another challenge was the broth. Like many of you, I initially thought store-bought broth was the way to go. But I quickly discovered that many store-bought broths are loaded with sodium, which can easily overwhelm the gravy. I started using low-sodium broth and adjusting the salt to taste, giving me much more control over the final flavor.Garlic Gone Wrong: Burnt and Bitter
Garlic is key to this recipe, but it’s a delicate balance. Burnt garlic is bitter and unpleasant. I learned to add the minced garlic to the melted butter and cook it gently over medium heat, just until fragrant and lightly golden. This infuses the butter with garlic flavor without burning the garlic itself. This is also a trick I use when I make Garlic Parmesan Crockpot Chicken And Potatoes.Drippings Dilemma: Liquid Gold
The pan drippings from a roasted chicken are like liquid gold for gravy. They add a depth of flavor that you just can’t get from broth alone. But what if you don’t have drippings? I experimented with adding a tablespoon of chicken bouillon paste to the broth, which helped to mimic the savory richness of the drippings. I also found that browning the chicken before roasting it helps to create more flavorful drippings.The Final Breakthrough: Patience and Precision
Ultimately, the key to perfect chicken and garlic gravy is patience and precision. It’s about taking the time to cook the roux properly, gradually adding the liquids, and simmering the gravy until it reaches the desired consistency. It’s about tasting and adjusting the seasoning along the way, and not being afraid to experiment with different ingredients and techniques. Now I can make a gravy to go with Garlic Parmesan Chicken Meatloaves without breaking a sweat.Foolproof Chicken and Garlic Gravy: The Technique Summarized
Here’s the foolproof method, distilled into a numbered list for your convenience:- Bloom the Garlic: Gently cook minced garlic in melted butter until fragrant and lightly golden.
- Build the Roux: Whisk in flour and cook, stirring constantly, until smooth and lightly golden (2-3 minutes).
- Whisk and Incorporate: Gradually whisk in chicken broth, a little at a time, ensuring each addition is fully incorporated before adding more.
- Simmer and Thicken: Simmer over low heat for 10-15 minutes, or until the gravy has thickened to your desired consistency, stirring occasionally.
- Taste and Adjust: Taste the gravy and adjust the seasoning with salt and pepper as needed. Add pan drippings for extra flavor.
- Strain for Silkiness (Optional): For an extra-smooth gravy, strain it through a fine-mesh sieve before serving.
What are the three key scientific principles behind making a silky smooth gravy?
The key scientific principles are starch gelatinization, fat emulsification, and the Maillard reaction.
What’s the best way to avoid lumps when making chicken and garlic gravy?
To avoid lumps, gradually whisk in the chicken broth a little at a time, ensuring each addition is fully incorporated before adding more. Cooking the roux properly is also crucial.
What can I use if I don’t have pan drippings from roasted chicken for the gravy?
If you don’t have pan drippings, you can use more chicken broth or add a tablespoon of chicken bouillon paste to the broth to mimic the savory richness.
How can I prevent the garlic from burning and becoming bitter in the gravy?
Add the minced garlic to the melted butter and cook it gently over medium heat, just until fragrant and lightly golden. Avoid burning it.
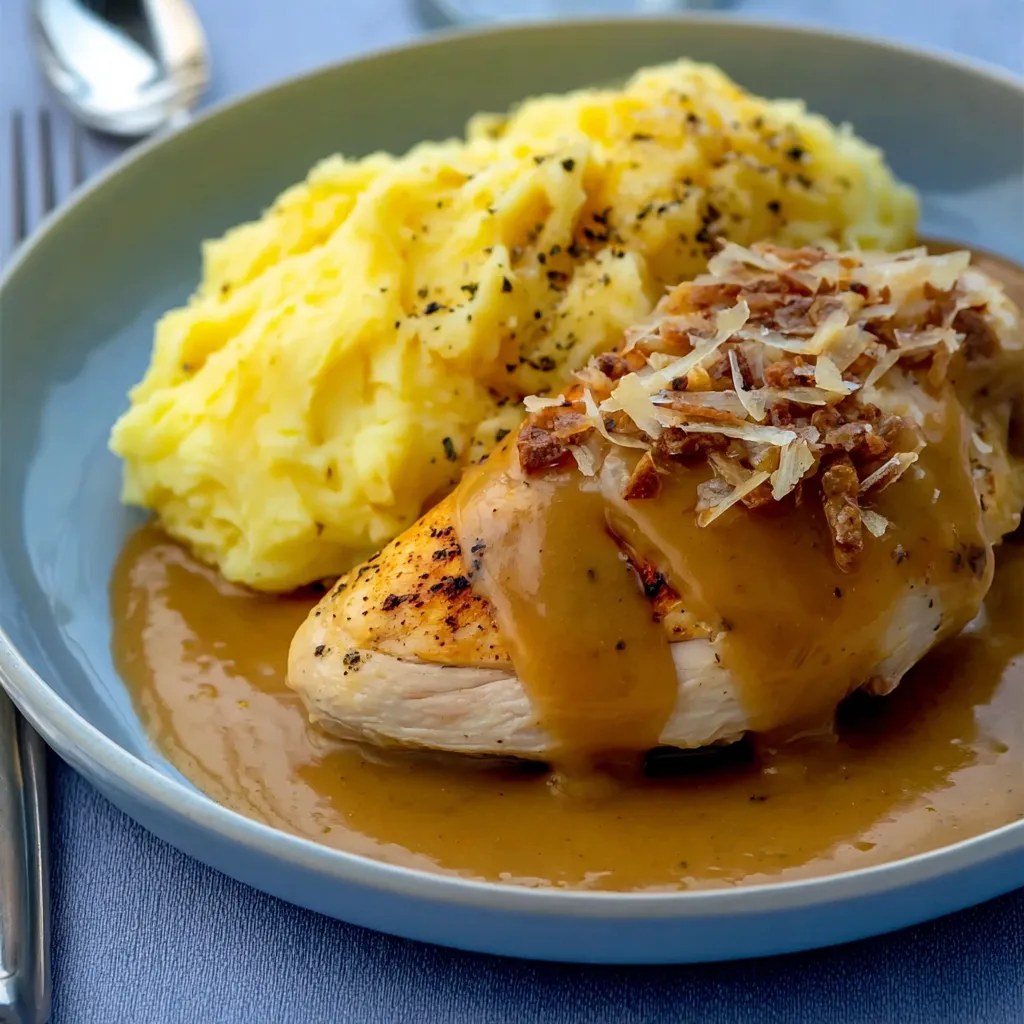
Best Chicken and Garlic Gravy
This recipe provides a roadmap to gravy perfection, resulting in a silky smooth, flavorful chicken and garlic gravy. It emphasizes the importance of a well-made roux, proper broth usage, and careful garlic blooming to avoid bitterness.
Ingredients
Equipment
Method
- In a medium saucepan, melt the butter over medium heat.
- Add the minced garlic and cook for 1-2 minutes, until fragrant and lightly golden, being careful not to burn it.
- Whisk in the flour and cook for 2-3 minutes, stirring constantly, to create a smooth roux.
- Gradually whisk in the chicken broth, a little at a time, ensuring each addition is fully incorporated before adding more.
- Stir in the pan drippings from the roasted chicken (if using). If you don’t have drippings, simply use more chicken broth.
- Add the dried thyme and black pepper.
- Bring the gravy to a simmer, then reduce the heat to low and cook for 10-15 minutes, or until the gravy has thickened to your desired consistency. Stir occasionally to prevent sticking.
- Taste the gravy and adjust the seasoning with salt as needed. If the gravy is too thick, add a little more chicken broth to thin it out. If it’s too thin, continue simmering until it reaches the desired consistency.
- Garnish with chopped fresh parsley (optional) before serving.
Notes
For an extra-smooth gravy, strain it through a fine-mesh sieve before serving. If you don’t have pan drippings, chicken bouillon paste can be added to the broth to enhance flavor. Store leftover gravy in an airtight container in the refrigerator for up to 3 days. Reheat gently on the stovetop, adding a little broth if needed to thin.