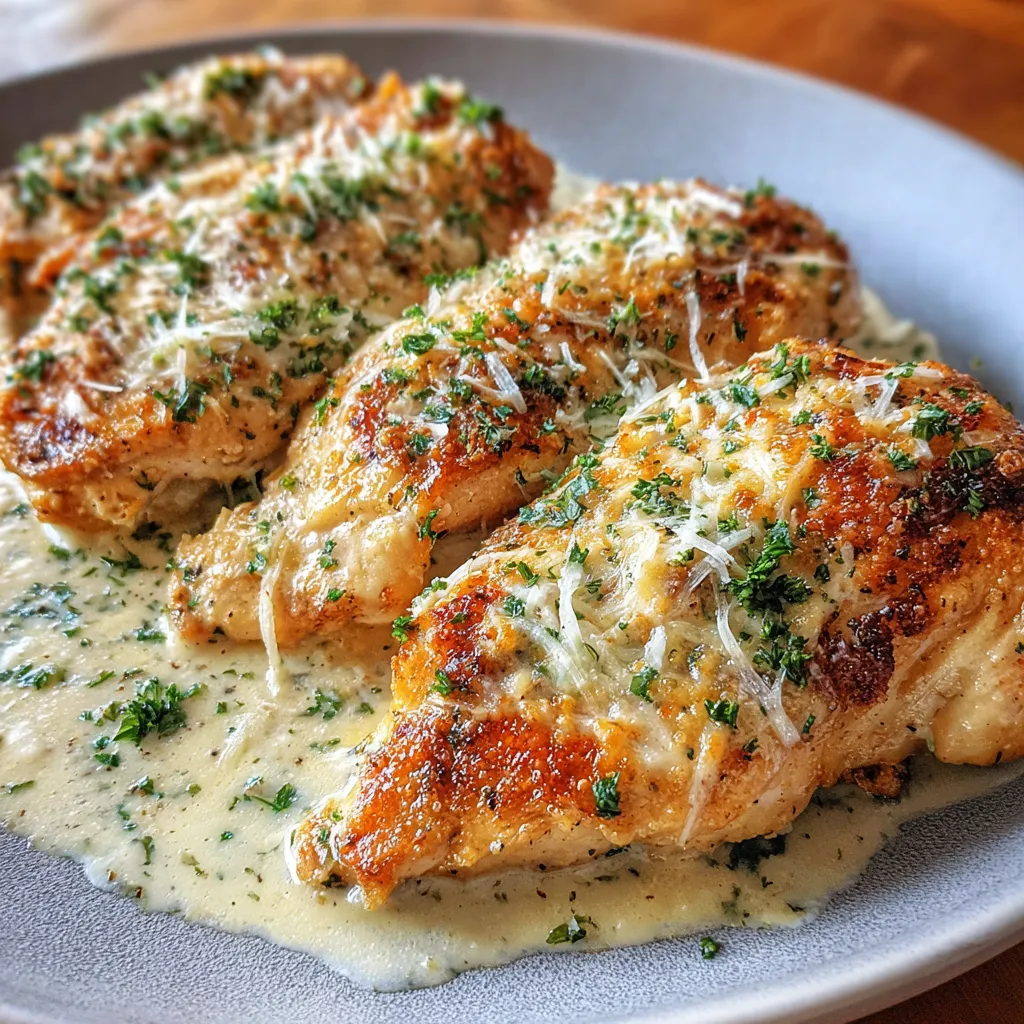
There’s a reason baked caesar chicken has earned a permanent spot in weeknight dinner rotations. It solves the most common chicken breast problem, dryness, by wrapping the meat in a thick, tangy sauce that locks in moisture from the moment it hits the oven. The result is tender, flavorful chicken with a golden, bubbly top that looks far more impressive than the effort it takes.
This recipe comes together with about 10 minutes of hands-on work. The sauce is a simple mix of Caesar dressing, sour cream, and Parmesan that does all the heavy lifting during the bake. No fancy technique, no complicated steps, just a dinner that consistently delivers.
Why You’ll Love This Baked Caesar Chicken
The creamy Caesar sauce doubles as a moisture barrier, keeping the chicken from drying out at high heat. That’s the practical reason it works, but the flavor is what keeps you coming back.
The combination of Caesar dressing and Parmesan brings bold, savory depth without requiring a long marinade or elaborate seasoning blend. The sour cream adds a gentle tang and helps the sauce cling to the meat rather than pooling in the dish. A layer of mozzarella on top melts into a golden, slightly browned crust that makes every serving look restaurant-ready.
It’s also naturally low-carb and high in protein, making it a meal that works across a variety of dietary preferences. Add pasta for the carb lovers, swap in vegetables for the low-carb crowd, and everyone leaves the table satisfied.
Ingredients for Baked Caesar Chicken with Creamy Parmesan Sauce
I always use freshly grated Parmesan here rather than the pre-shredded kind. It melts more evenly into the sauce and has a sharper, saltier flavor that makes a noticeable difference in the finished dish. Everything else on this list is straightforward and easy to find.
The Protein:
- 4 boneless, skinless chicken breasts (approx. 2 lbs)
- 1/2 teaspoon garlic powder
- Salt and freshly ground black pepper, to taste
The Creamy Caesar Sauce:
- 1 cup creamy Caesar salad dressing
- 1/2 cup sour cream
- 1 cup freshly grated Parmesan cheese, divided
The Topping:
- 1/2 cup shredded mozzarella cheese
- Fresh parsley, chopped, for garnish
For the Caesar dressing, I go for a creamy bottled dressing rather than a light or vinaigrette-style version. The fat content is part of what makes the sauce thick enough to coat the chicken properly. If you want a slightly tangier, higher-protein sauce, Greek yogurt swaps in for the sour cream with excellent results. For a bit of crunch, a handful of crushed croutons or panko breadcrumbs scattered over the mozzarella before baking adds a nice contrast to the creamy base.
How to Make Baked Caesar Chicken with Creamy Parmesan Sauce
The key here is getting the chicken to a consistent thickness before it goes into the dish. In my experience, skipping that step is what causes uneven cooking, where the thin end dries out before the thick center reaches temperature.
- Preheat and prep. Set the oven to 375°F (190°C). Lightly grease a 9×13-inch baking dish with non-stick cooking spray.
- Pound the chicken. If your chicken breasts are thick, place them between two sheets of plastic wrap or in a zip-lock bag and pound to an even 1-inch thickness using a meat mallet or rolling pin. This step is worth the extra two minutes.
- Season. Sprinkle both sides of each breast with garlic powder, salt, and black pepper. Arrange them in a single layer in the prepared dish with no overlapping.
- Mix the sauce. In a medium bowl, whisk together the Caesar dressing, sour cream, and 1/2 cup of the Parmesan until smooth and combined.
- Coat the chicken. Spread the sauce generously over each breast, covering them fully. Don’t be shy here. A thick coat is what protects the meat during baking.
- Add the cheese topping. Sprinkle the remaining 1/2 cup of Parmesan and all of the mozzarella evenly over the sauce layer.
- Bake. Place the dish uncovered in the preheated oven for 25-30 minutes, until the chicken reaches an internal temperature of 165°F at the thickest part. A meat thermometer removes all guesswork.
- Broil for color. For a golden, bubbly crust, switch the oven to broil for the final 2-3 minutes. Stay close and watch it carefully. The cheese can go from golden to burnt quickly.
- Rest before serving. Pull the dish from the oven and let the chicken rest for 5 minutes before cutting in. This allows the juices to redistribute and the sauce to set, which keeps every bite moist and saucy rather than running dry.
What to Serve with Baked Caesar Chicken
This baked caesar chicken pairs well with sides that can soak up the extra creamy sauce on the plate.
Fettuccine or pasta is the most natural pairing. Toss it with a little butter and garlic, and spoon the extra sauce from the baking dish directly over the top. It’s a complete meal with minimal extra effort.
Roasted potatoes are another crowd-pleasing option. The crispy edges and starchy interior are ideal for capturing the Caesar sauce. Garlic butter roasted potatoes are particularly good alongside this dish.
Steamed or roasted asparagus keeps things light and low-carb. The slightly bitter, grassy flavor balances the richness of the sauce beautifully.
Roasted broccoli works on the same principle and is an easy side to throw in the oven during the last 15 minutes of the chicken’s bake time.
A simple Caesar salad is a fun echo of the dish’s flavors and takes no time to put together if you already have dressing open.
Pro Tips & Variations
Don’t skip the rest period. Five minutes of patience after the chicken comes out of the oven is the difference between a moist, saucy result and a dry one. Cutting in too early lets all the moisture run off.
Use a meat thermometer. Chicken breasts vary in size, and ovens vary in accuracy. Pulling the dish at exactly 165°F gives consistent results every time without relying on guesswork.
Make it ahead. The sauce can be mixed and stored in the refrigerator up to 24 hours before cooking. Assemble the dish, cover it, and refrigerate. Pull it out while the oven preheats and bake as directed.
Add a crunch layer. A mixture of panko breadcrumbs and a drizzle of olive oil scattered over the cheese before baking creates a toasted, crispy topping that plays nicely against the creamy sauce underneath.
Dietary swaps. For a lighter version, Greek yogurt in place of sour cream keeps the sauce thick while adding protein. Gluten-free Caesar dressings are widely available if you need to keep the dish completely gluten-free.
Storage & Reheating Tips
I store leftovers in an airtight container in the refrigerator for up to 3 days. The sauce firms up as it chills, which actually makes it easier to portion for the next day. To reheat, I find the oven works better than the microwave for maintaining texture. Cover the dish loosely with foil and warm at 325°F for about 10-12 minutes. If the sauce looks thick after refrigerating, a small splash of milk stirred in before reheating brings it back to the right consistency.
For meal prep, bake a full batch on Sunday and portion into containers with your chosen side. Lunch or dinner is ready in minutes for the next few days, and the flavors hold up well.
Common Questions
Can I use chicken thighs instead of breasts? Boneless, skinless chicken thighs work well here and are even more forgiving than breasts when it comes to staying juicy. Adjust the cook time slightly, as thighs may need an extra 5 minutes depending on size. The same 165°F internal temperature applies.
What if I only have shredded Parmesan? Pre-shredded Parmesan is fine in a pinch, though it won’t melt as smoothly into the sauce. The flavor will still be good. Fresh-grated gives you a noticeably creamier result.
My sauce is sliding off the chicken. What went wrong? This usually happens if the chicken wasn’t patted dry before seasoning or if the sauce was too thin. Pat the chicken breasts dry with paper towels before adding the seasoning, and make sure your Caesar dressing is a full-fat, creamy variety rather than a light or vinaigrette-style.
Can I freeze this dish? The chicken itself freezes fine, but the creamy sauce can separate after thawing and reheating. If you plan to freeze, consider making a fresh batch of sauce when you reheat rather than freezing it fully assembled.
How do I know the chicken is done without a thermometer? Pierce the thickest part with a knife. The juices should run clear with no pink. That said, a meat thermometer is a worthwhile investment for chicken dishes like this one where the sauce makes it harder to judge visually.
Baked Caesar Chicken with Creamy Parmesan Sauce
Ingredients
Equipment
Method
- Preheat oven to 375°F (190°C). Lightly grease a 9×13-inch baking dish with non-stick cooking spray.
- If chicken breasts are thick, pound to an even 1-inch thickness using a meat mallet or rolling pin. Pat dry with paper towels.
- Season both sides of each chicken breast with garlic powder, salt, and black pepper. Arrange in a single layer in the prepared baking dish.
- In a medium bowl, whisk together the Caesar dressing, sour cream, and 1/2 cup of the grated Parmesan until smooth.
- Spread the sauce generously over each chicken breast, coating them fully.
- Sprinkle the remaining 1/2 cup Parmesan and all of the mozzarella evenly over the sauce layer.
- Bake uncovered for 25-30 minutes, until the chicken reaches an internal temperature of 165°F at the thickest part.
- Optional: Switch oven to broil for the final 2-3 minutes to achieve a golden, bubbly crust. Watch closely to prevent burning.
- Remove from oven and let the chicken rest for 5 minutes before serving. Garnish with fresh chopped parsley.